How to Use

How to use the campervan|Your post-booking handbook

For guests who have booked or are about to depart: handover, driving notes, power and A/C, water and bathroom, beds, outdoor bundles, and return—organized in use order. Rates, deposit, bundle promos, and booking are on Price & Van; copy details from the booking page to LINE/WhatsApp.

Not booked yet? See Price & Van for rates, deposit, bundles, and booking. For trip ideas, browse customer stories.

Main intro video (watch this first)

~7 minutes|Full Taipei campervan inside-and-out tour, including bed conversion and main equipment.

Full inside-and-out campervan tutorial

Video link: Watch on YouTube (RcV0bOU4rLI)

This video is a full inside-and-out tour—equipment locations, how to use them, and dinette-to-bed conversion.

Note:There is no microwave on board at this time (called out in the video); equipment is as at handover.
1. Basic walkthrough on handover day

~30-minute handover. First-time renters are welcome—we teach by doing.

At handover we cover:

  • Basic vehicle operation
  • Vehicle height and driving cautions
  • How beds convert
  • Heating and A/C use
  • Fridge and power use
  • Water tanks and hot water
  • Toilet and treatment chemicals
  • Shore power and charging
  • Outdoor furniture and bundle packing
  • Before-return reminders

2. Exterior equipment, keys & interior layout

Spend a few minutes on the exterior map and keys before departure—handover will be easier to follow.

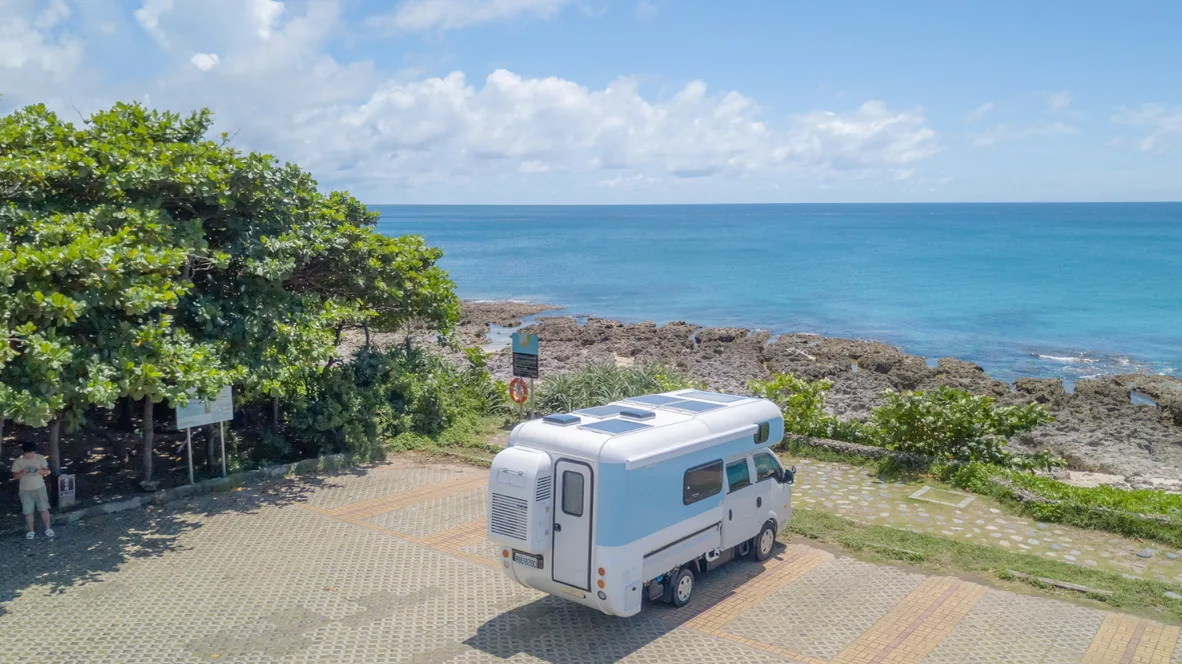
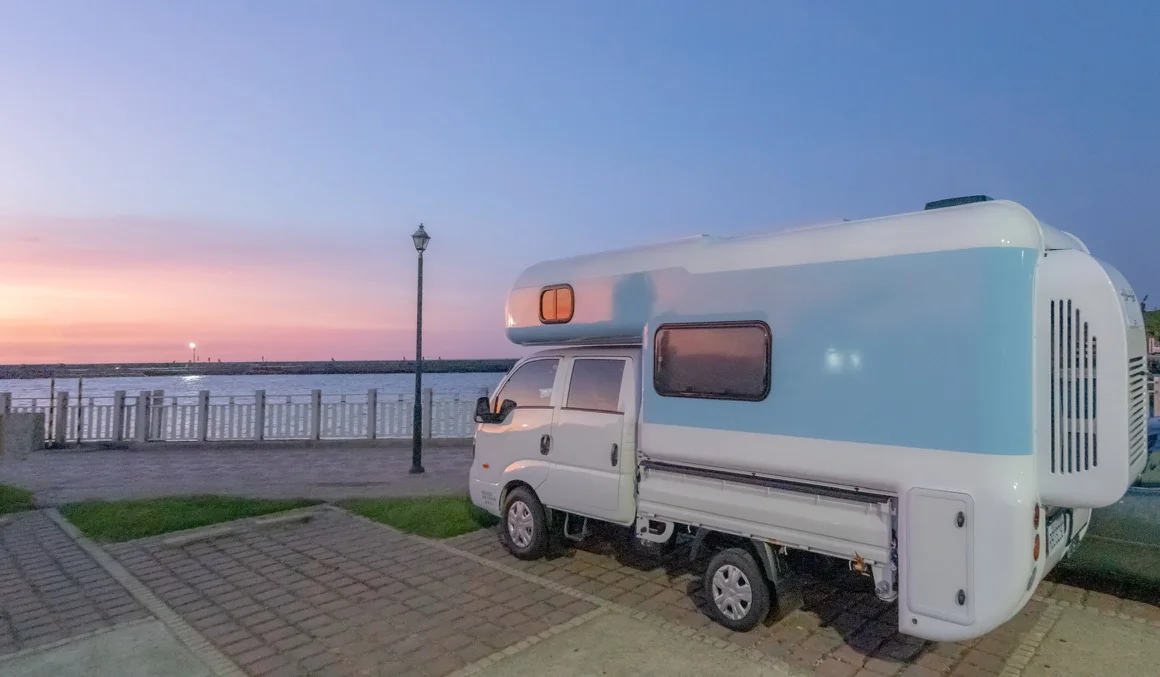
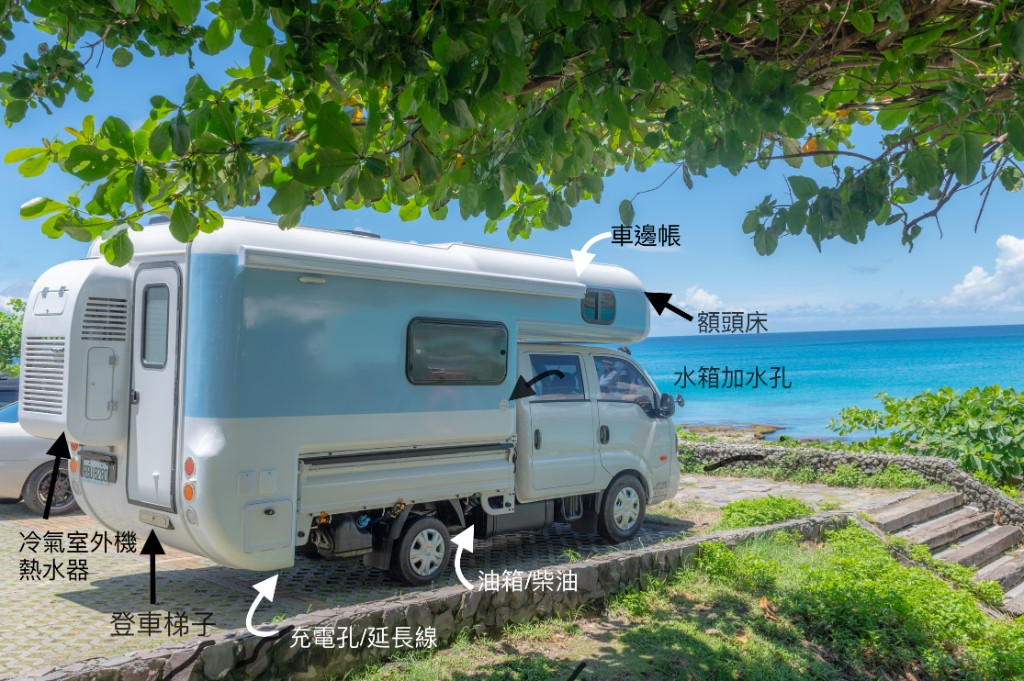
Taipei campervan exterior labels: overhead bed, rolled awning, fresh water fill, diesel tank, shore power inlet, entry ladder and A/C outdoor unit at a coastal parking area.
Exterior equipment overview (coastal parking example) Know exterior equipment locations for water fill, fuel, and shore power.
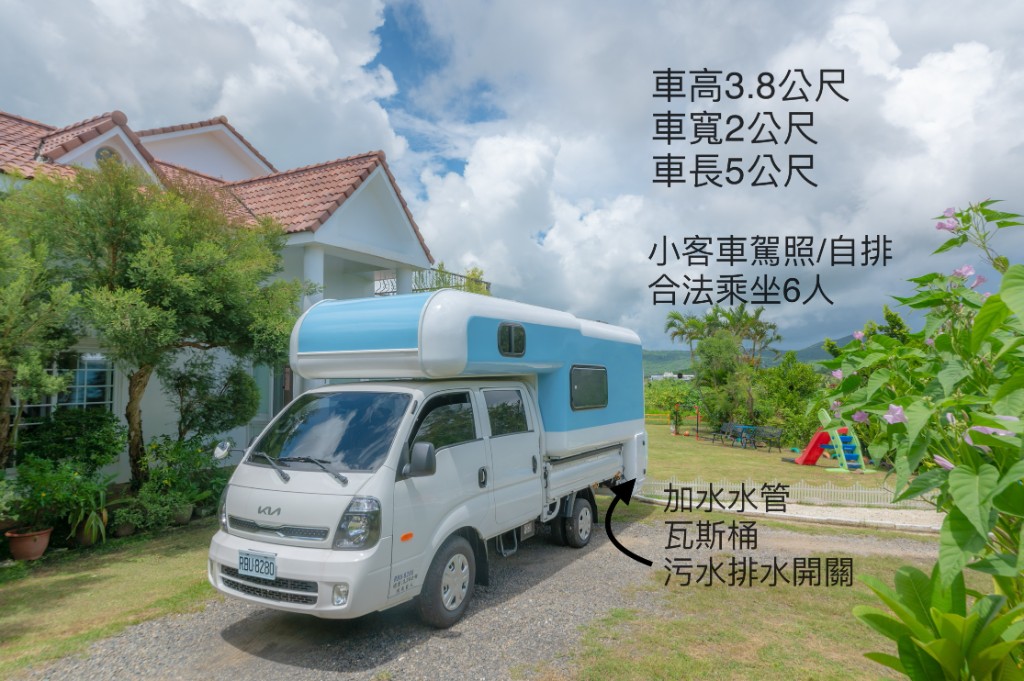
Taipei KIA automatic campervan exterior: height, width, length, standard license, 6 legal seats, side water hose, LP gas and grey water drain.
Exterior dimensions and side utilities/drain Diagram shows size and license needs; height ~3 m—watch bridges, awnings, and branches.
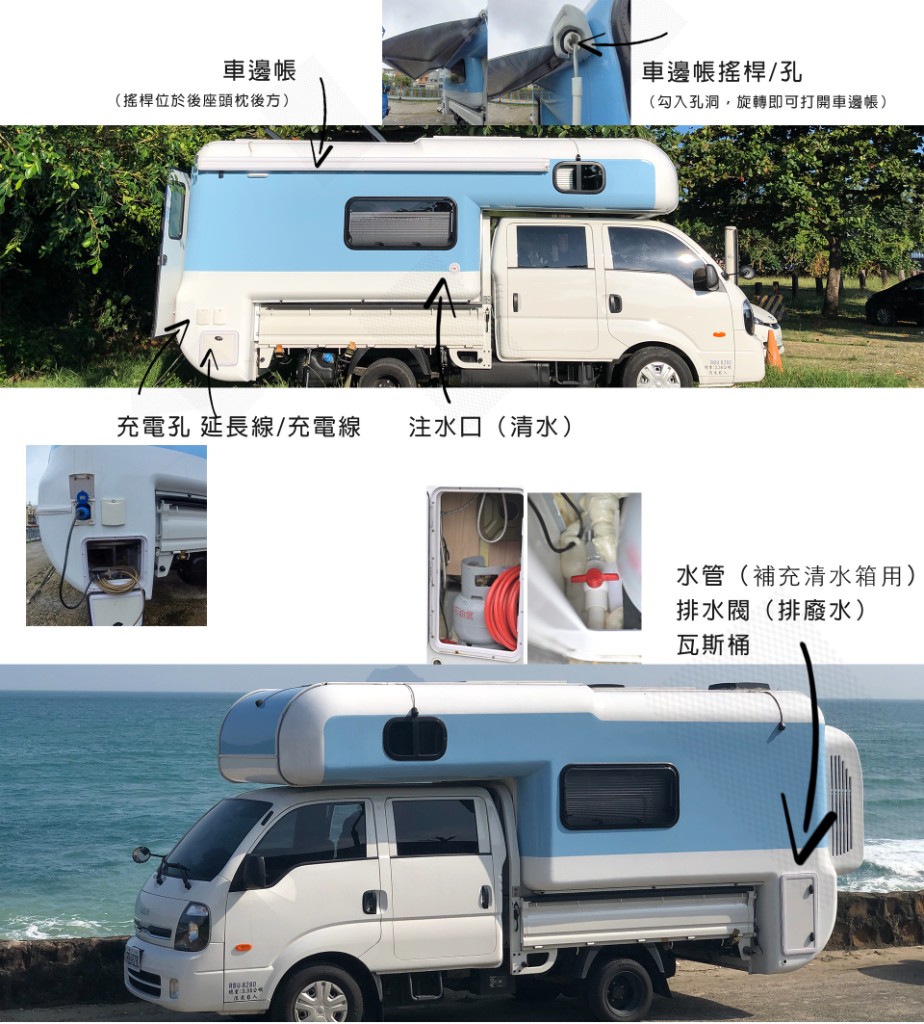
Taipei campervan guide: awning crank, campsite power and extension cord, fresh water inlet, exterior LP compartment and red fill hose, drain valve overview.
Side awning, water fill, power & drain (overview) Locations for manual awning, fresh water, campsite power, and grey water.
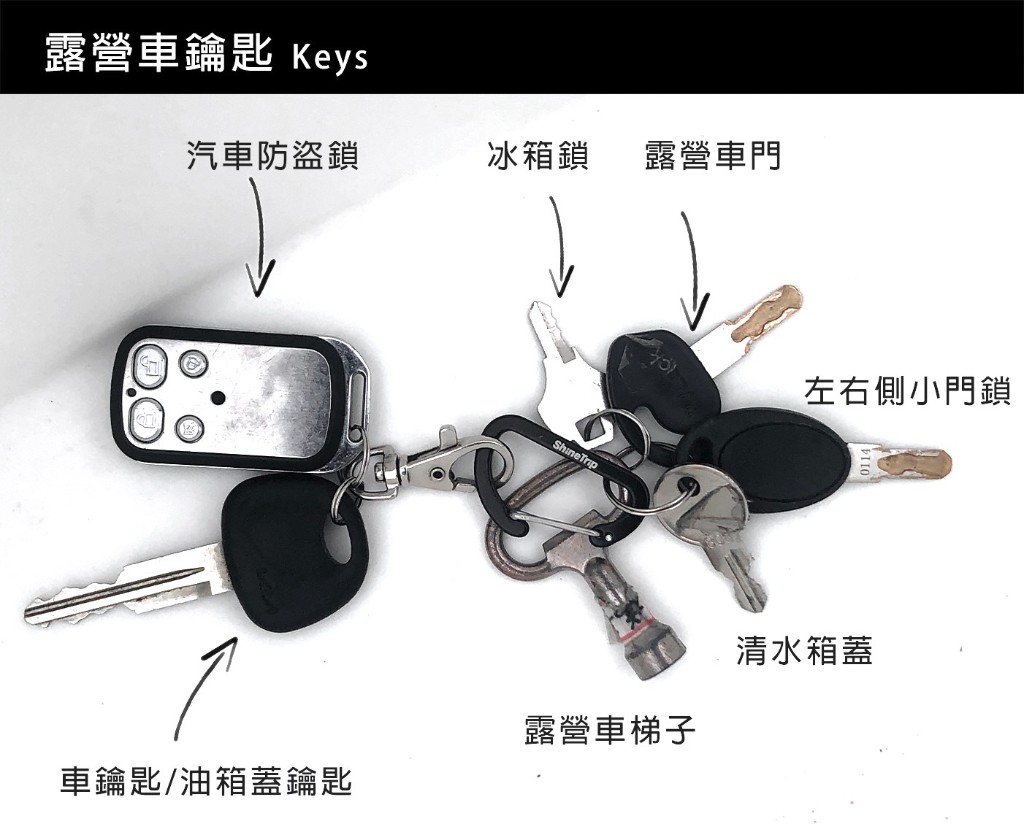
Campervan key guide: vehicle remote, fridge lock, camper door, side compartments, water cap, ladder, engine and fuel cap keys—for pre-rental preview.
Campervan keys overview You receive keys for vehicle remote, camper door, exterior compartments, fridge lock, water cap, ladder, and engine/fuel cap.
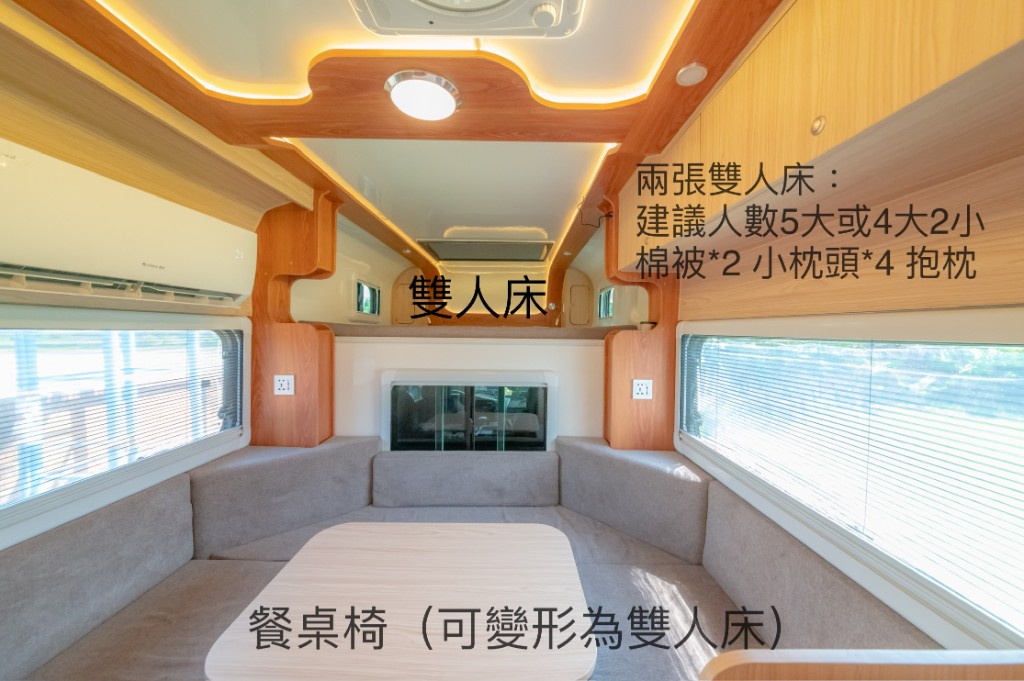
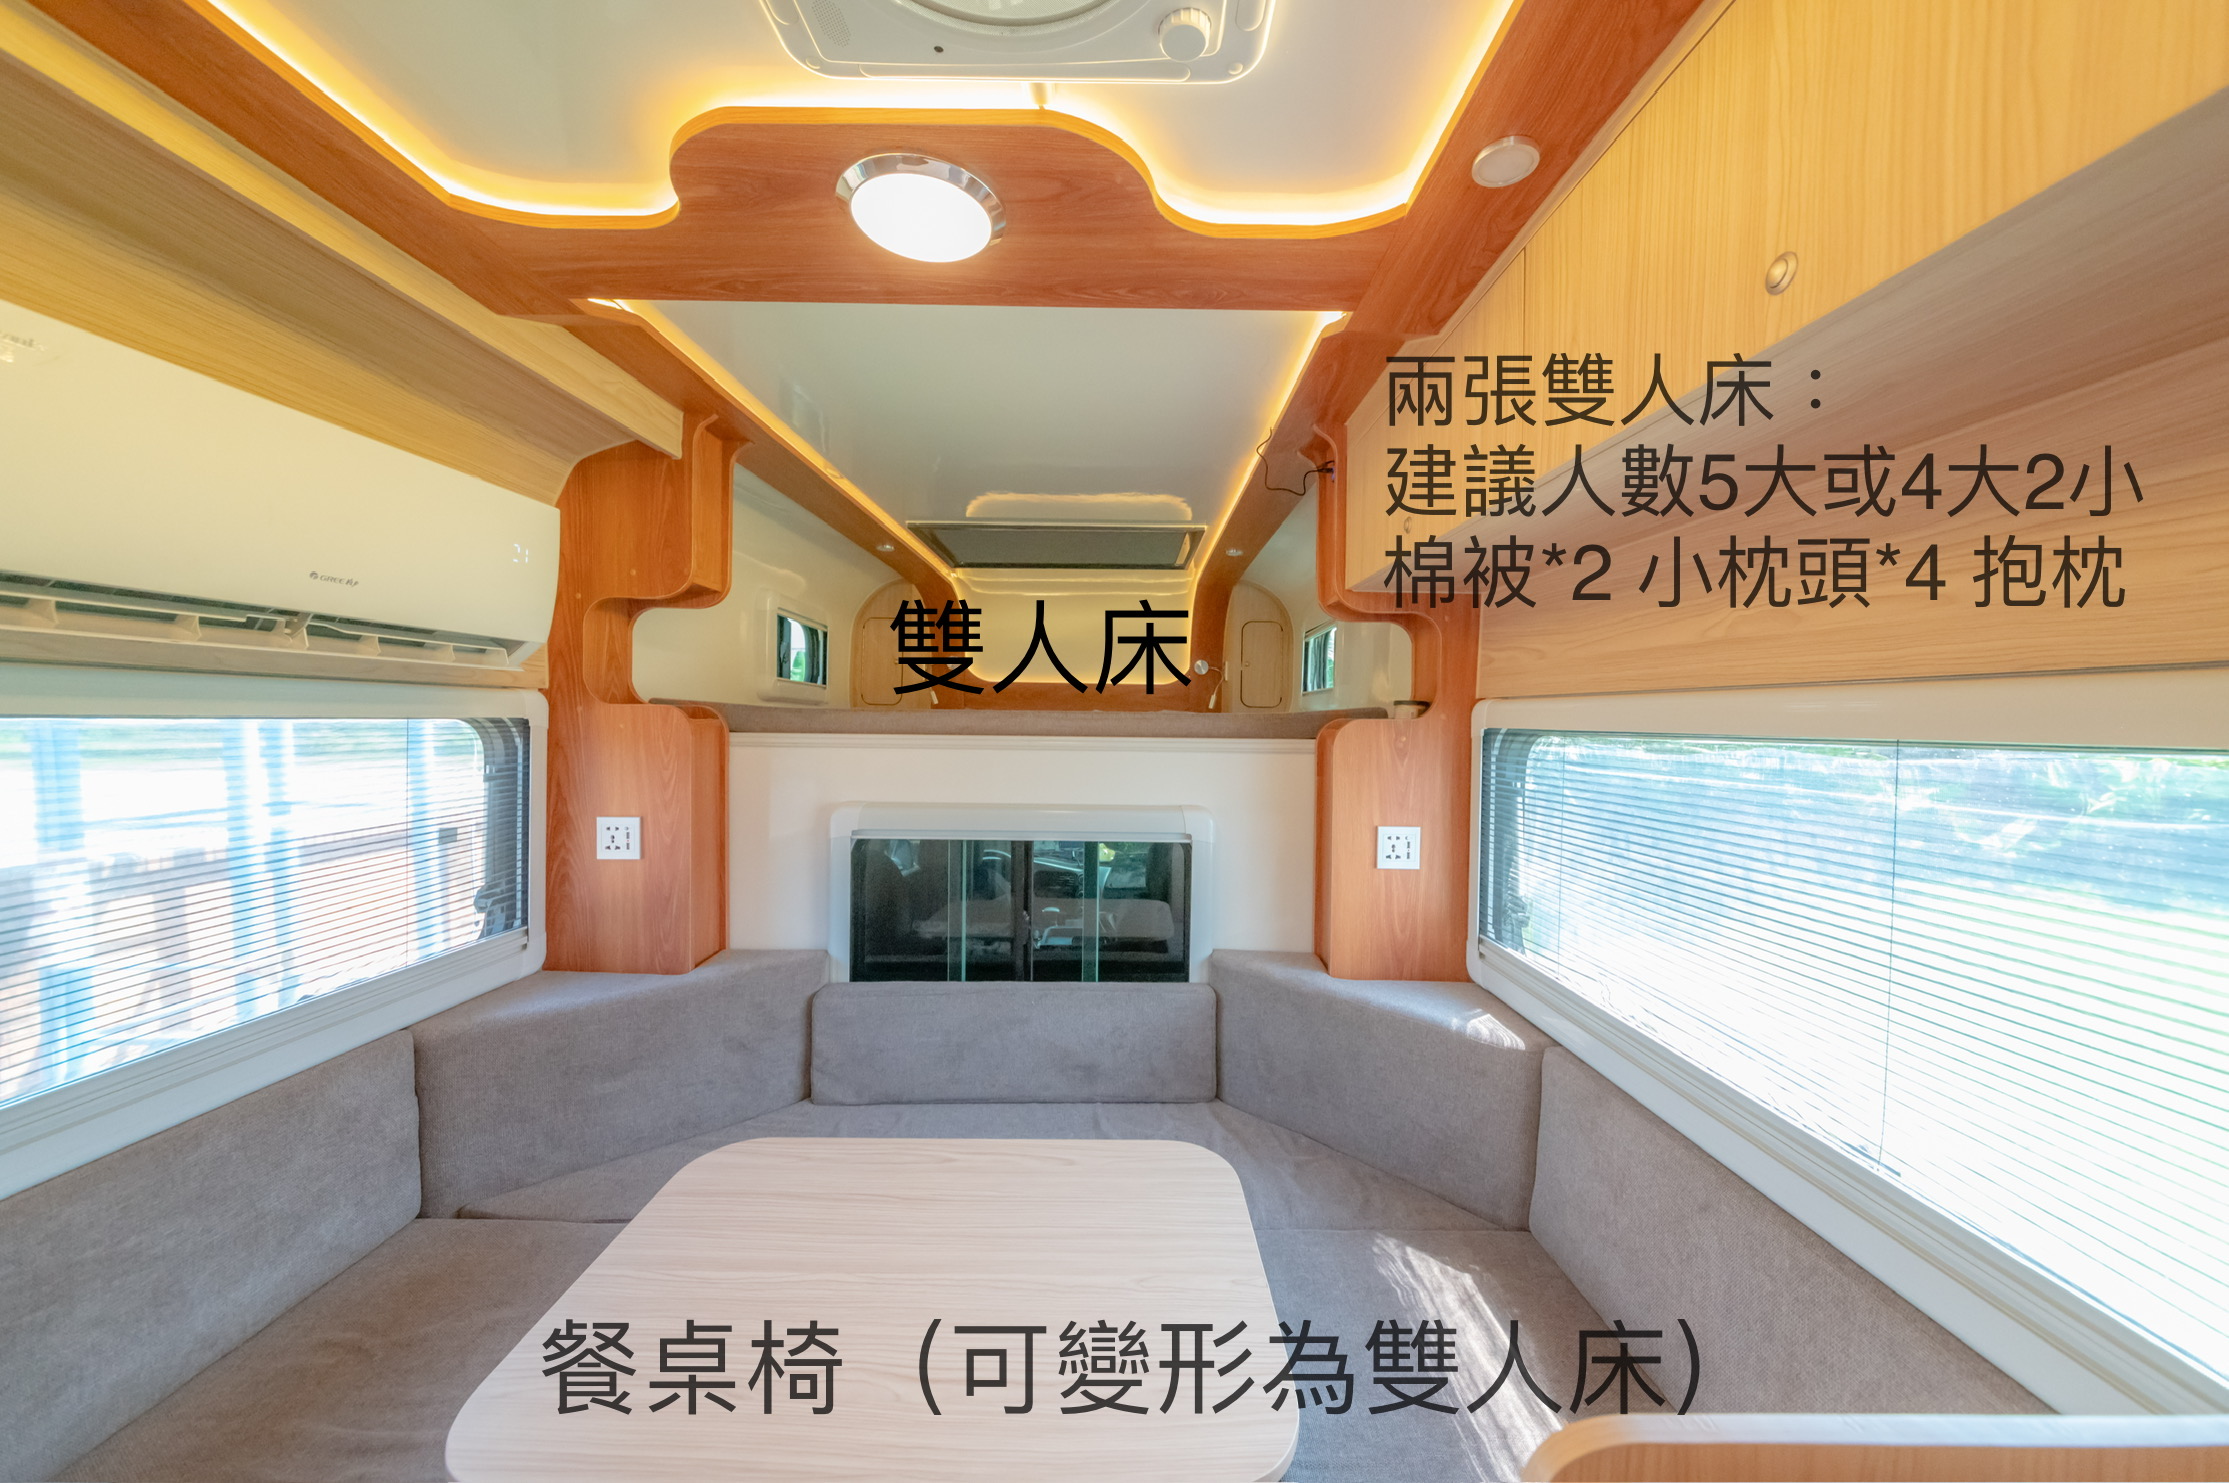
Taipei campervan interior: U-shaped sofa and dining table convert to double bed, overhead double bed, split A/C and lighting—sleeps 5 adults or 4+2 kids.
Two double beds and dinette-to-bed Dine by day, sleep at night—great for family campervan trips and friends.
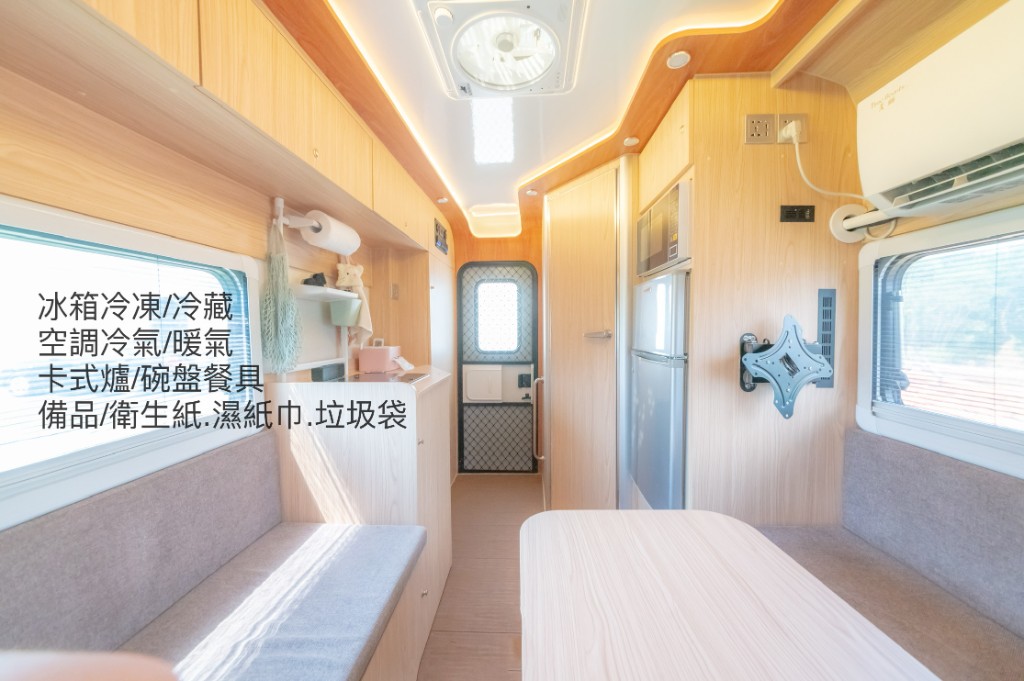
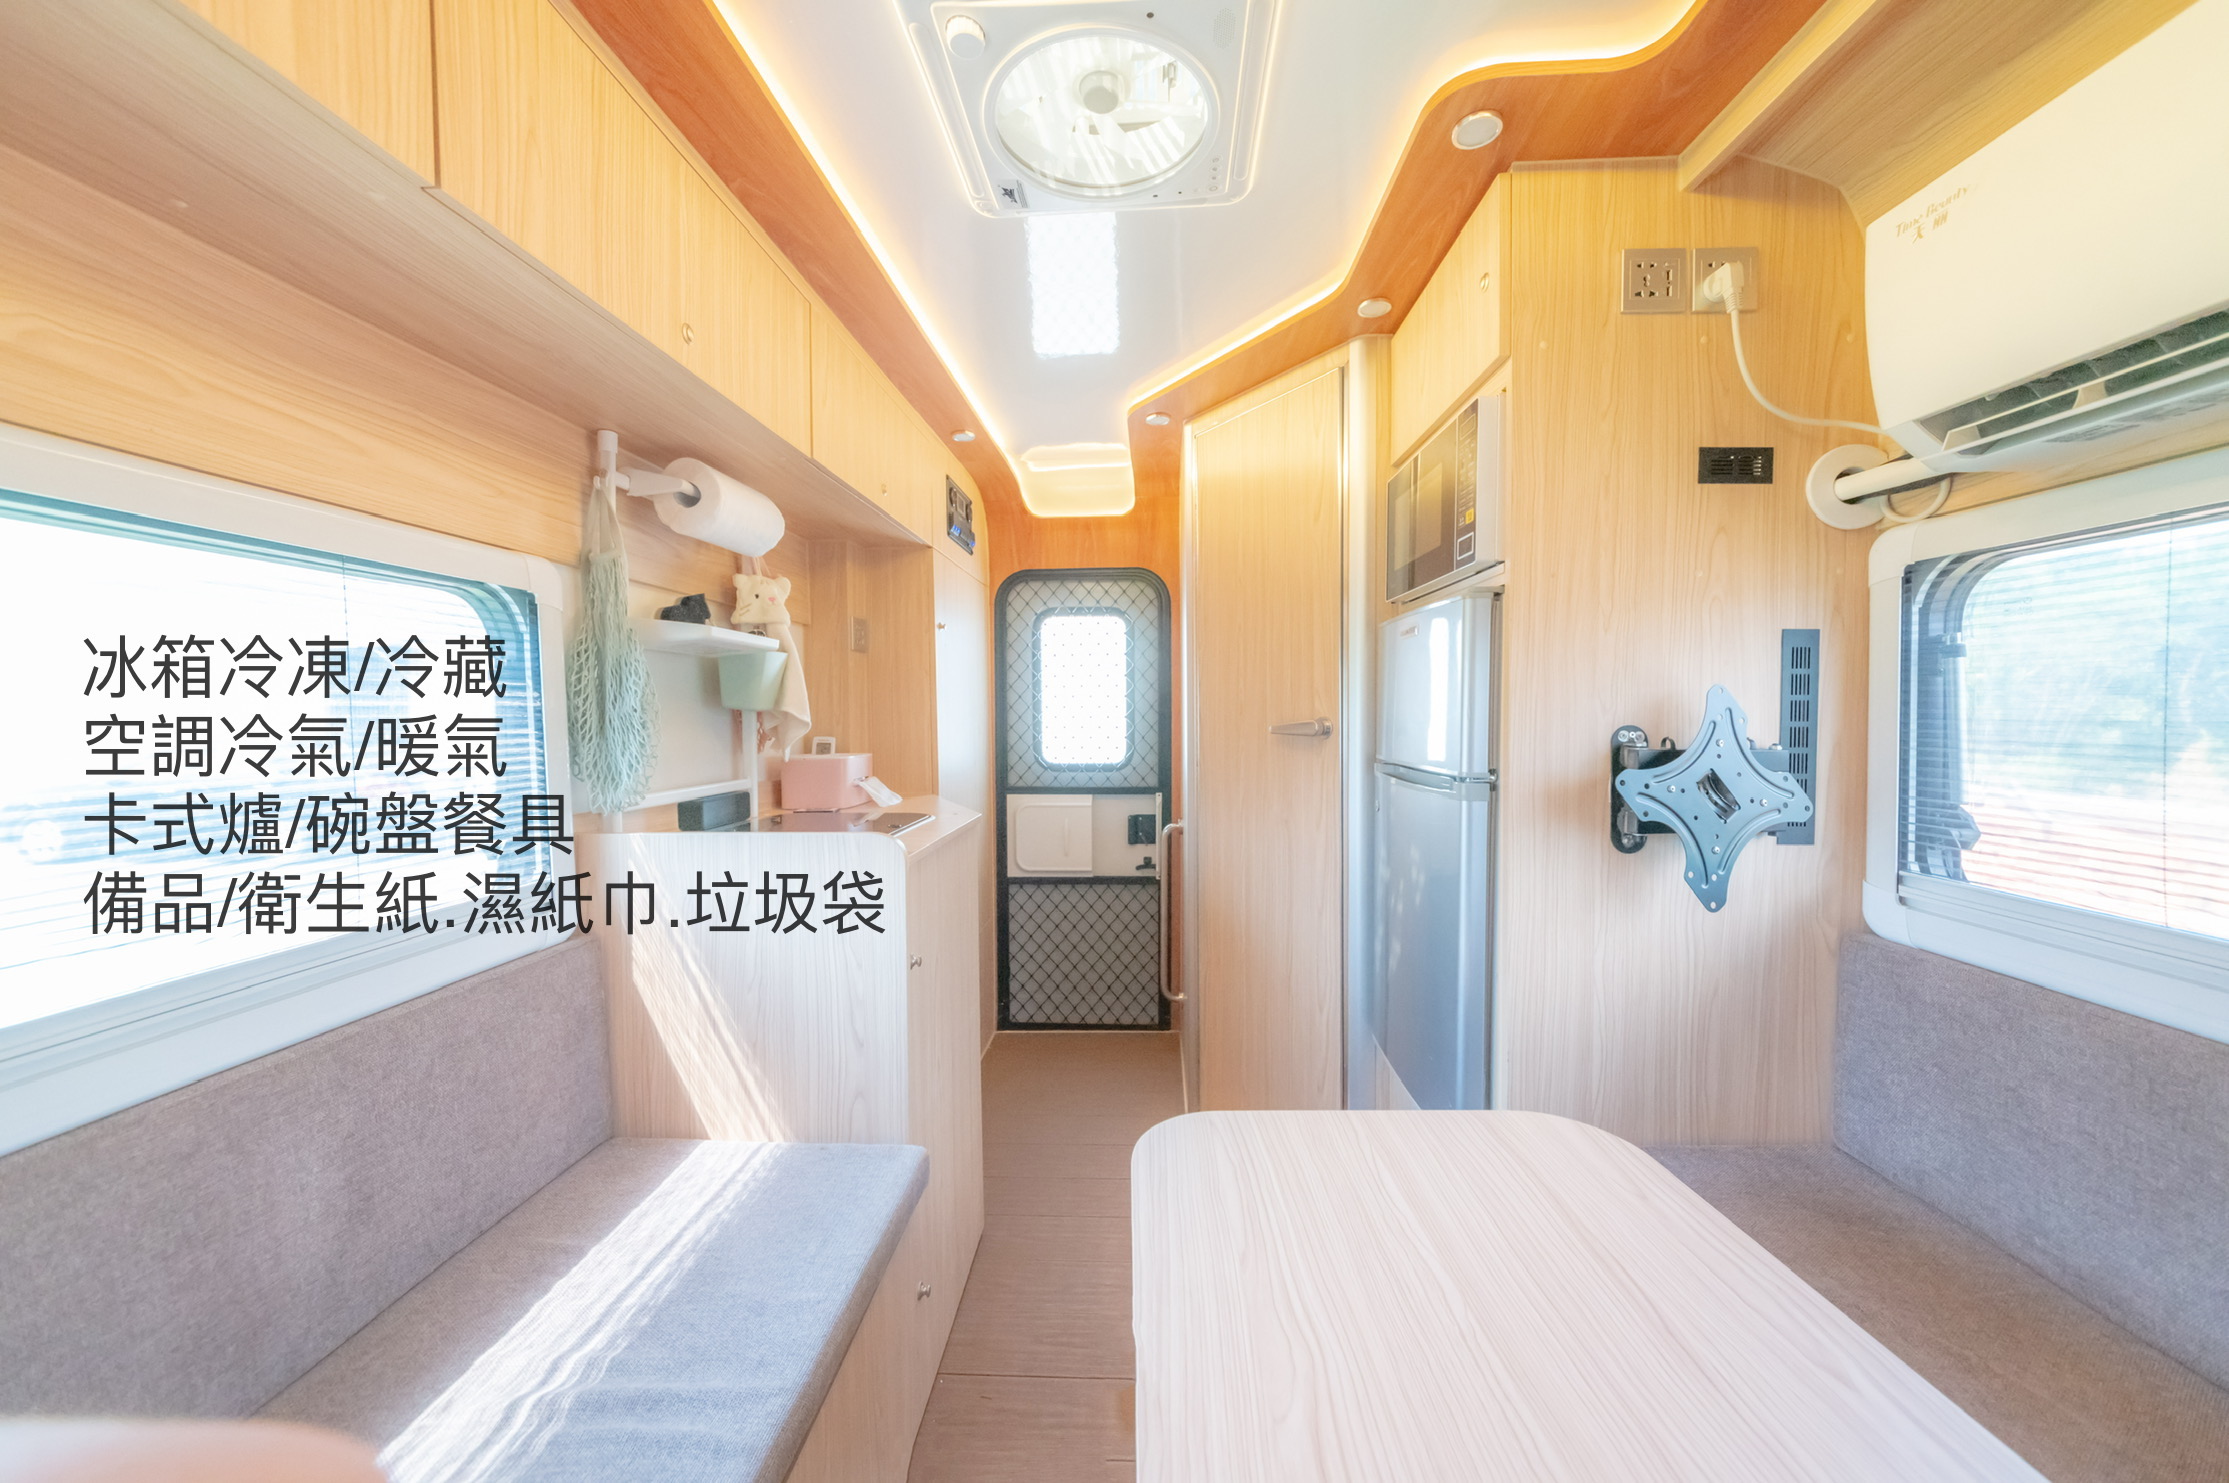
Taipei campervan aisle view: inverter A/C, two-door fridge, galley and dining storage, portable stove and tableware setup.
Kitchen, fridge & climate Store food in fridge/freezer; secure stove and storage before driving.
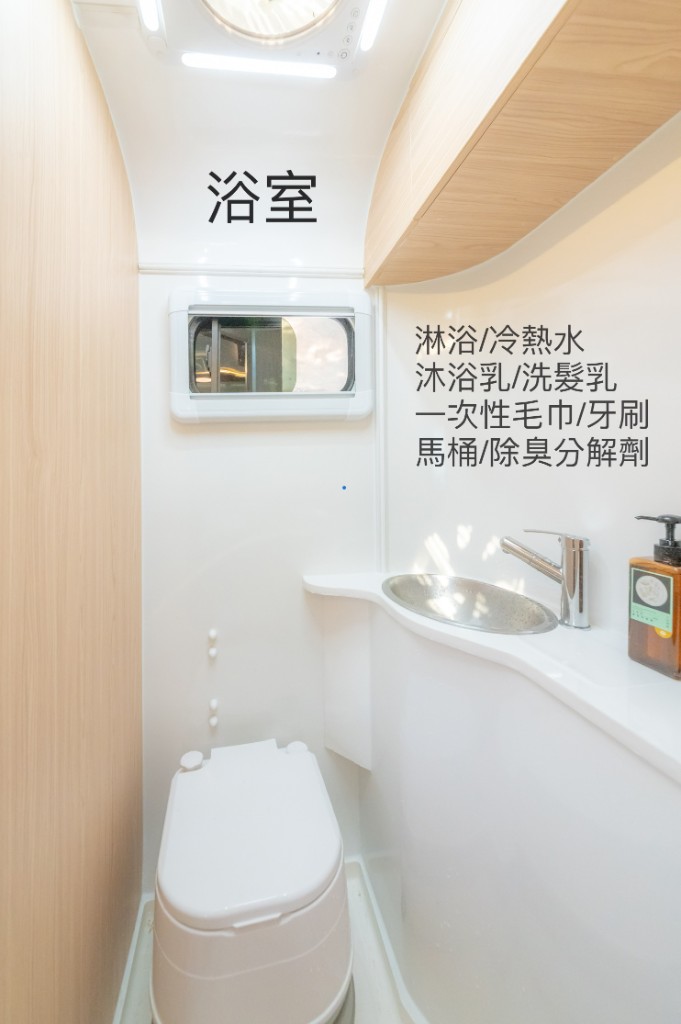
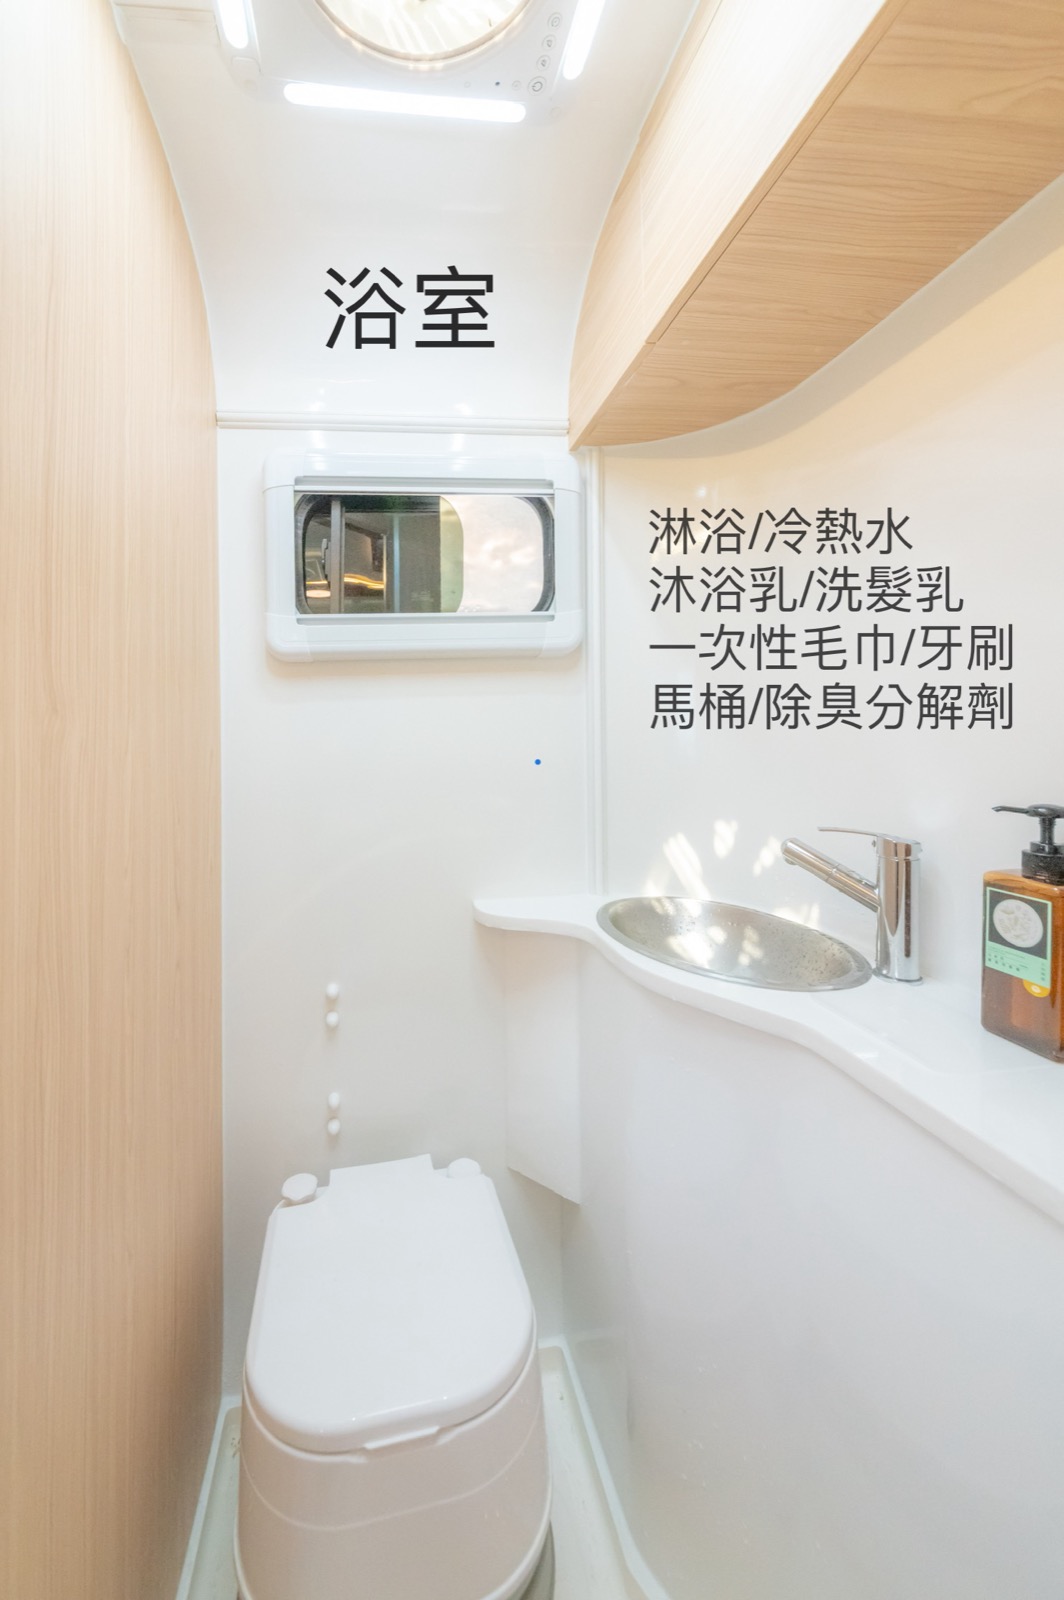
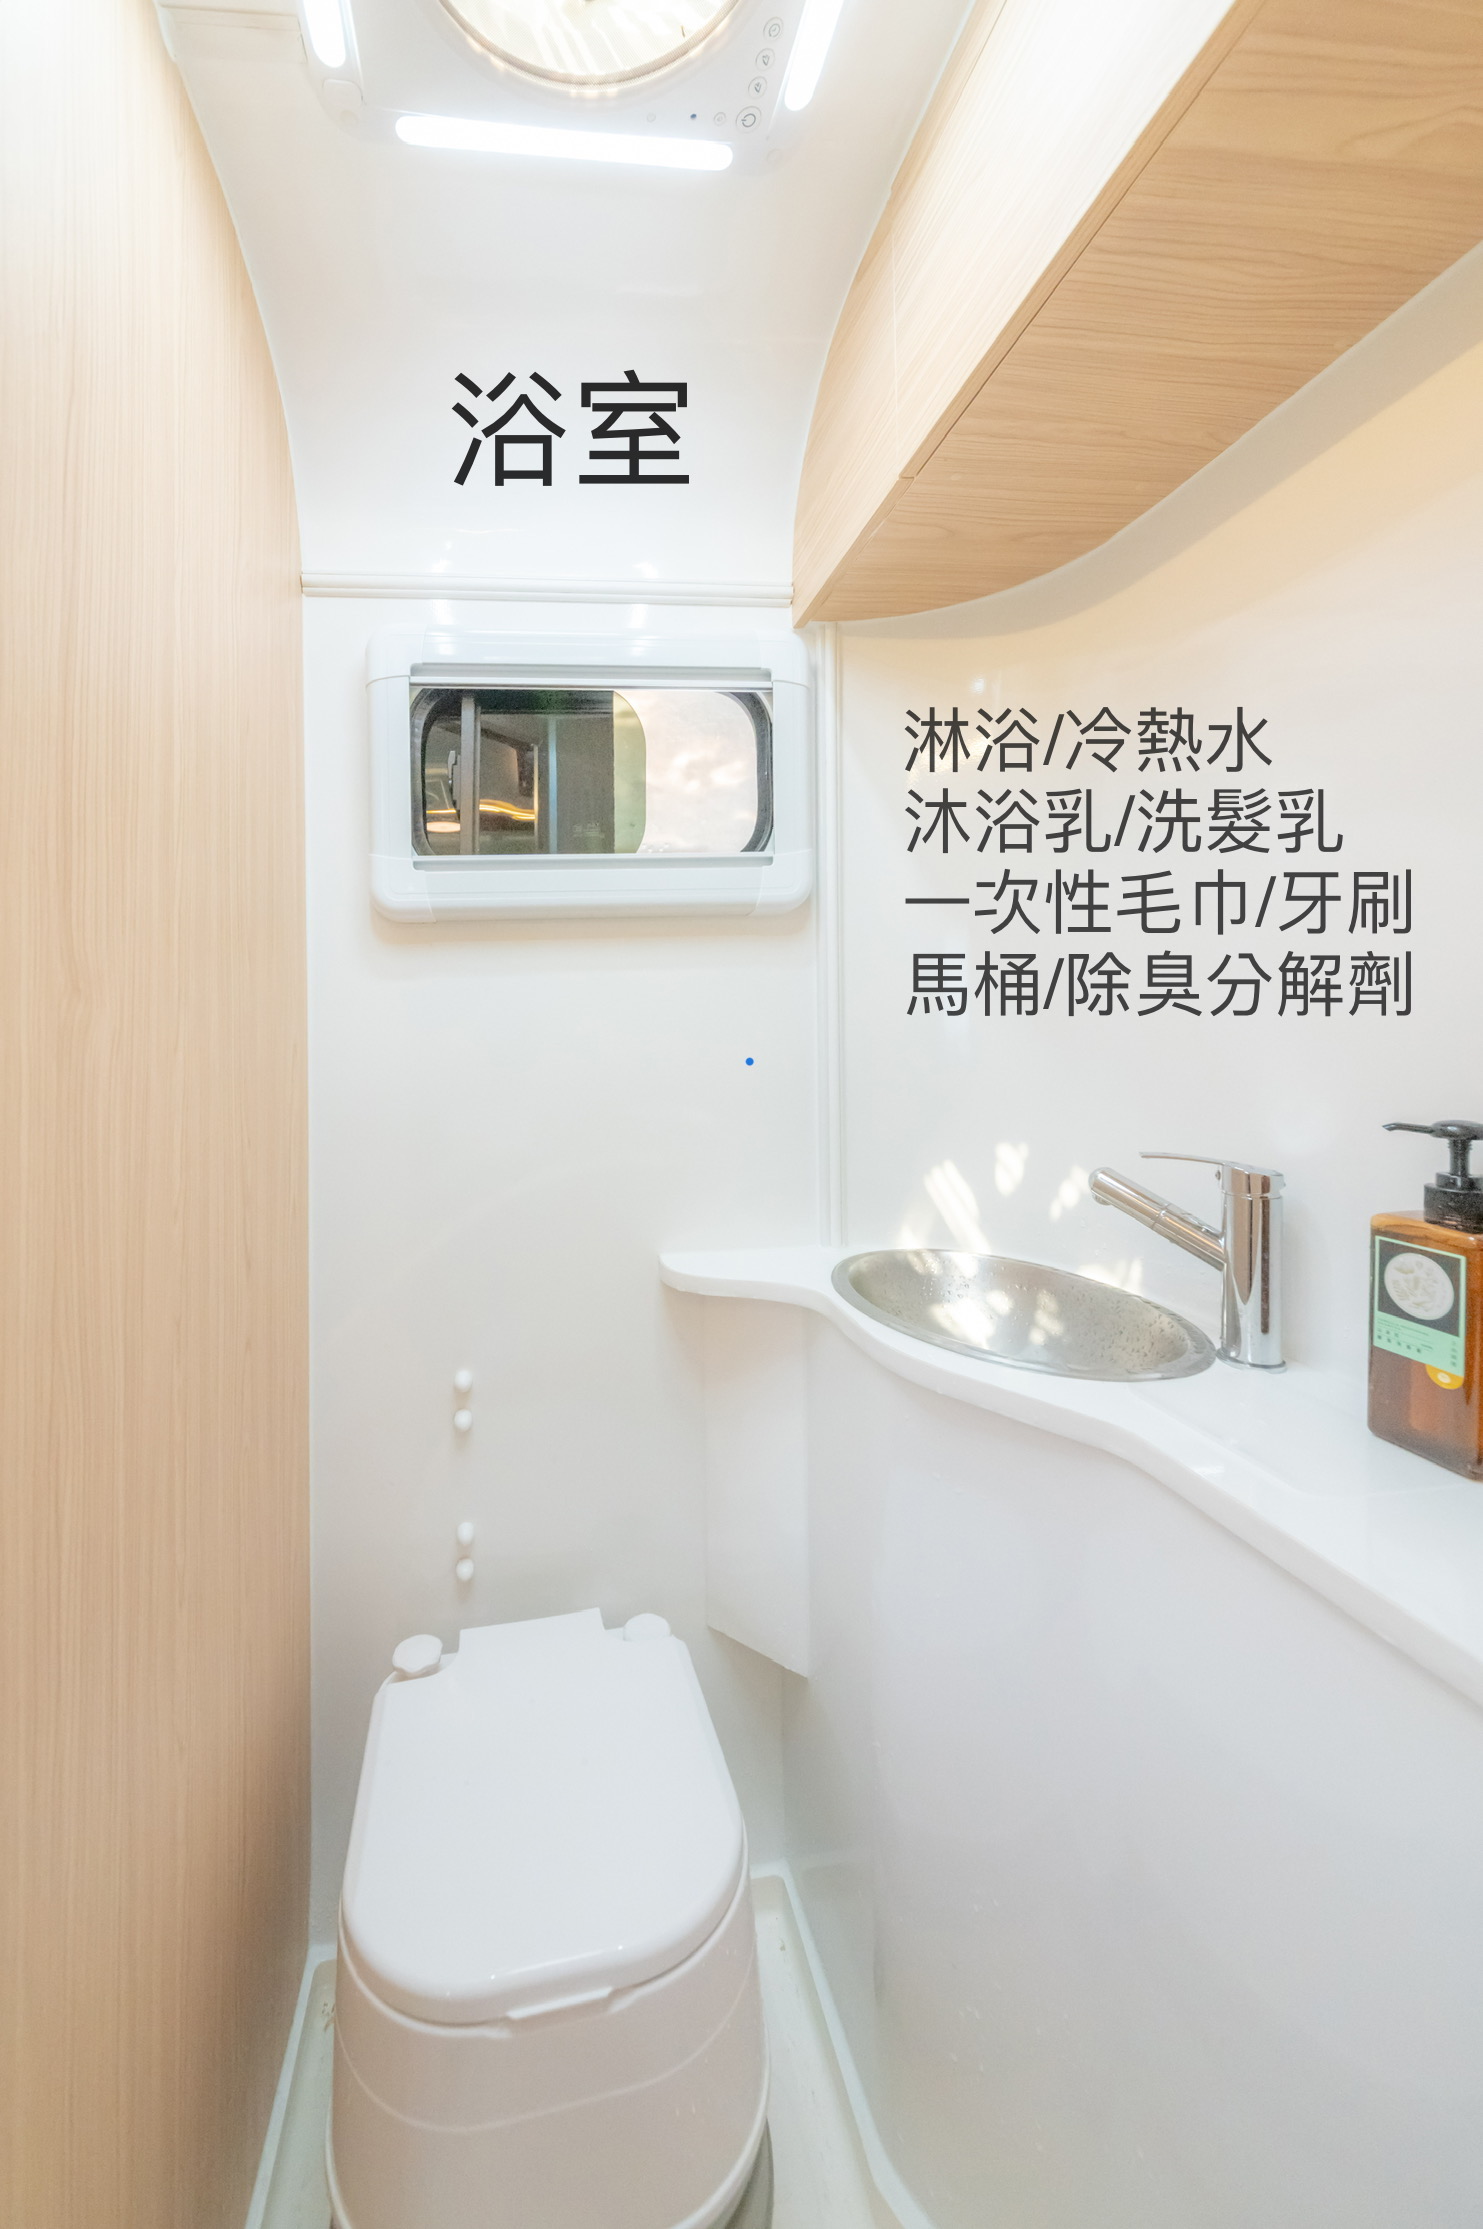
Taipei campervan private bathroom: hot/cold shower, toilet, sink, ventilation and lighting with basic toiletries.
Private bathroom (shower/toilet/sink) Compact bathroom lowers the bar for beginners; keep showers short—tied to fresh water.

3. When driving, height is what matters most

Campervan height is about 3 m (~one story)—watch bridges, signs, branches, and eaves.

  • Do not enter underground parking
  • Do not force low awnings: Old-building awnings/eaves and entrance canopies under ~3 m clearance—our ~3 m van cannot pass safely. Detour or use open lots with enough height.
  • Mountain roads: watch for branches
  • Convenience stores, gas stations, B&B eaves—extra care
  • Take your time backing up and turning
  • Keep a steady pace—avoid sharp turns and hard stops like in a small car
Scratches and damage:Minor marks from normal use are fine; roof/awning/tree hits causing large damage or leaks may incur repair costs. When parking, pick the first or last space in a row—easier for others.
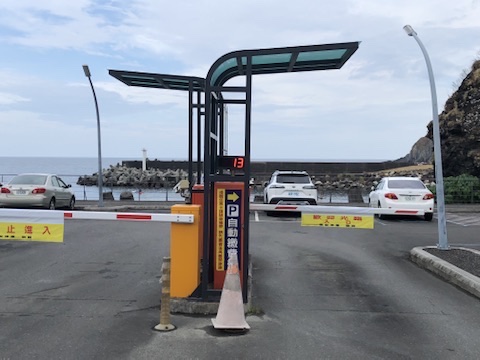
Coastal parking entrance: metal and glass canopy below one-story clearance—high-top campervan cannot pass safely; detour or use open parking.
Real example: parking entrance canopy Canopies like this are too low for the campervan. Treat anything under ~3 m as no-go—get out and look, or use another entrance.
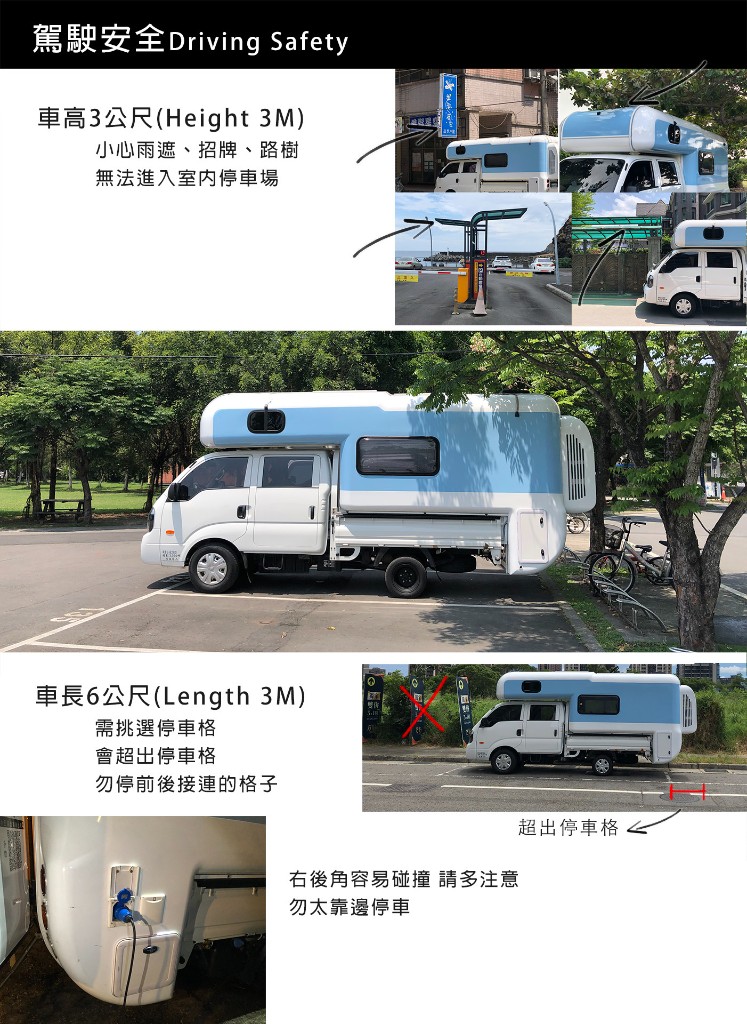
Taipei campervan driving safety diagram: 3 m height, watch awnings, signs and trees, no underground parking, rear overhang and right-rear corner caution.
Driving safety: clearance, trees & parking Detour rather than squeeze under low clearance; leave space when parking—watch the right rear corner.

4. How to manage power, A/C & charging

In short: charge while driving by day; plug in at camp at night—don’t wait until empty.

Onboard battery covers lights, phone charging, fridge, and basics. Long A/C use drains faster—prefer campsites with shore power.

For 3 days 2 nights without A/C, power is usually enough. With A/C, expect 8–10 hours. Charging ~7%/hour while driving works even with A/C on—try not to drop below 10%.

How to read battery level? Use voltage as a guide

Near the coulomb meter you’ll find a voltage chart:

VoltsApprox. charge
13.5V90%+
13.4V~80%
13.3V~70%
13.2V~60%

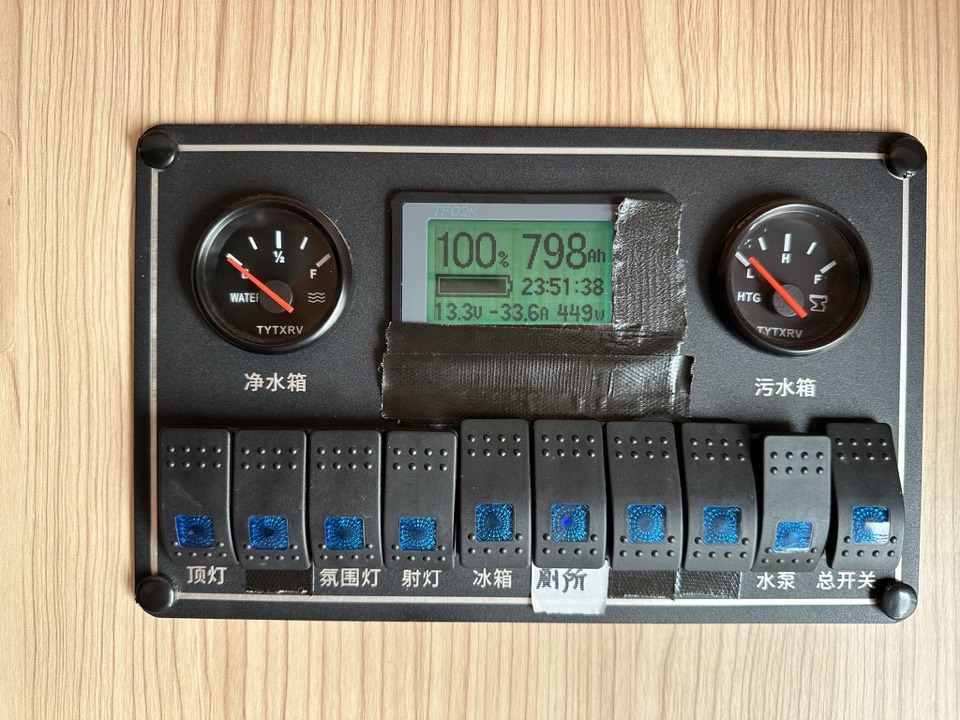
Center: positive = charging, negative = draining; right side shows watts in use—higher means more draw.

Campervan power monitor panel guide showing volts, charge/drain status and live wattage.
Campervan power panel guide Panel shows charge level, charge/drain status, and live wattage.
Campervan power panel close-up: positive/negative current and wattage for quick charge or drain reading.

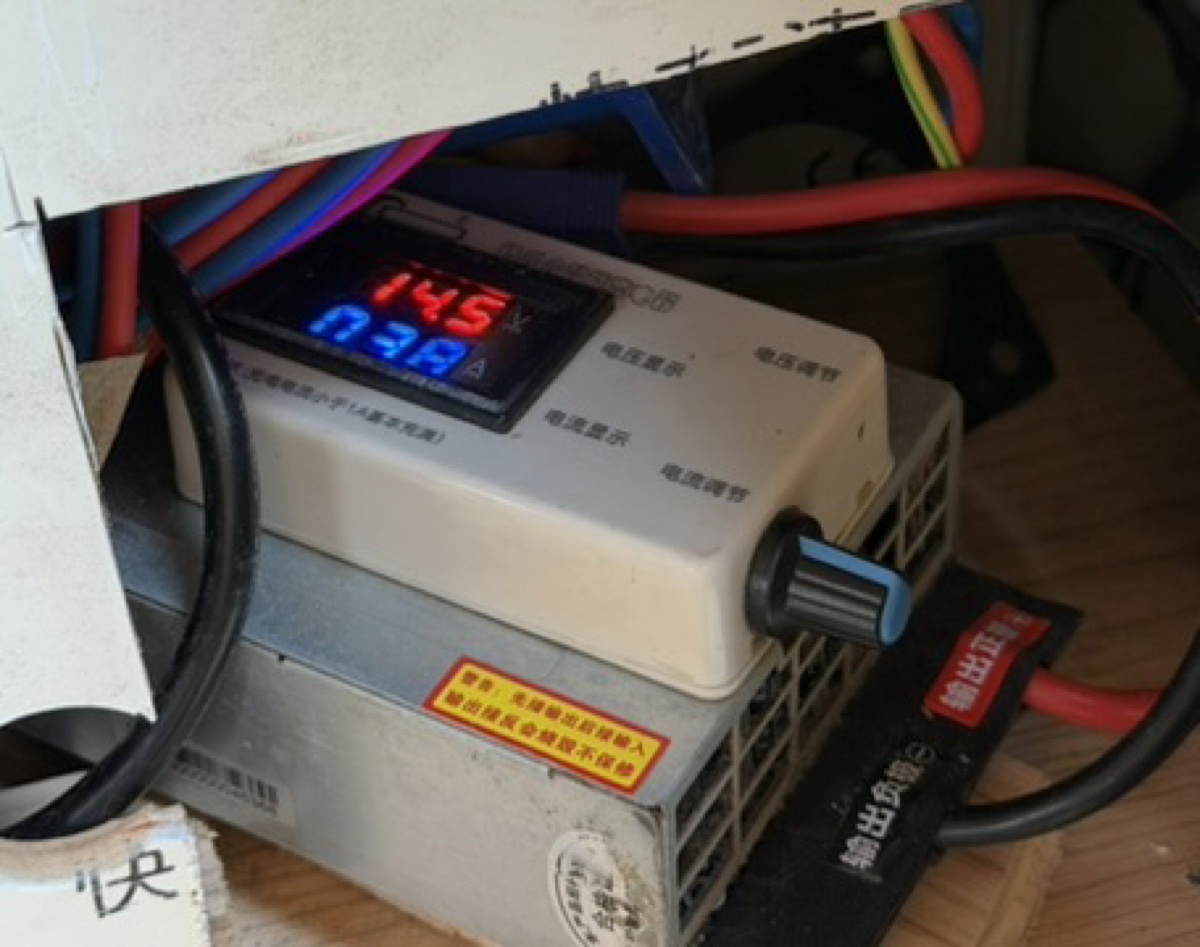
Adjusting charge speed? Blue knob below coulomb meter

Open the door below the meter for the blue knob that controls charge rate. If the campsite limits power, set it to middle or below to avoid tripping breakers.

Taipei campervan charge speed knob behind coulomb meter door—blue knob controls rate; panel shows 14.5V and 0.38A live readings.
Charge rate knob location At weak campsites, keep the knob at middle or below.

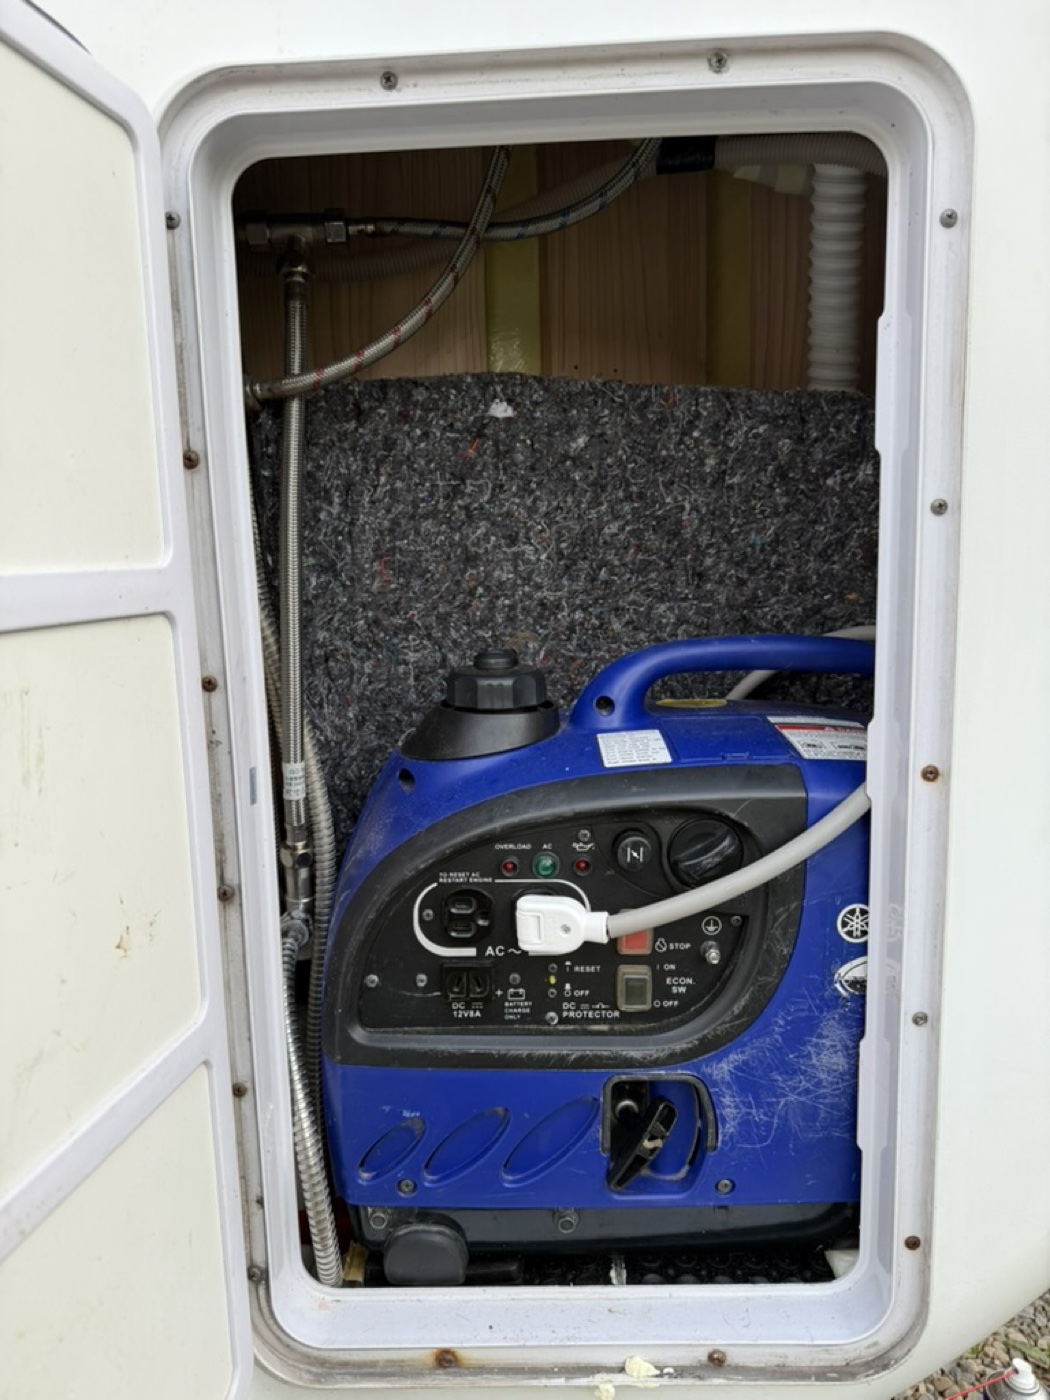
Built-in generator (Yamaha): left rear compartment

The left rear compartment has a factory Yamaha built-in generator for charging while driving—top up before camp. It’s noisy inside; for A/C overnight outside campsites, request a portable generator (see FAQ).

Taipei campervan: Yamaha blue built-in generator in left rear compartment charges while driving; red portable generator recommended for quiet seaside overnight A/C.
Built-in generator in left rear compartment Charges while driving; for A/C overnight off-site, ask about a portable generator.

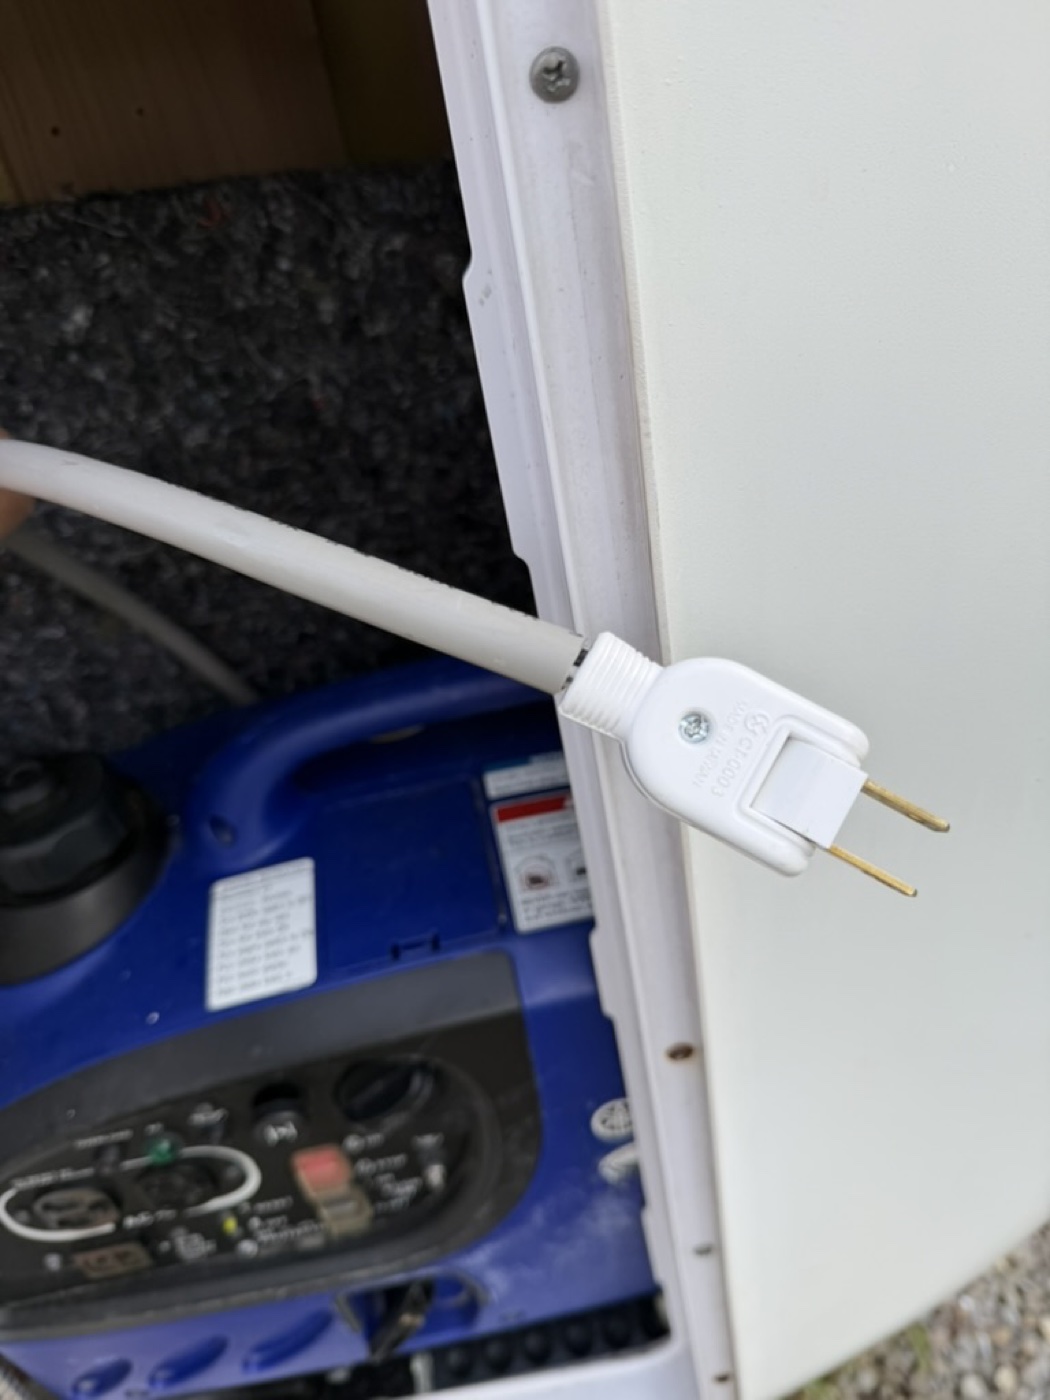
Campervan charge plug: same for shore power and generator

This white two-pin plug is used for both campsite shore power and generator charging:

  • Campsite: use the extension cord to the campsite outlet.
  • Generator: plug into the generator AC outlet (portable generator too).
Taipei campervan white two-pin charge plug in left rear bay—use extension cord to campsite outlet or generator AC socket.
Campervan charge plug (white two-pin) Shore power: use extension cord. Generator: plug into AC outlet.

5. Water tanks, shower & bathroom

You can shower—it’s not a hotel bathroom; not for long, heavy use.

  • 110 L fresh water for washing, showering, and daily use.
  • Water heater provides hot and cold water.
  • Toilet needs treatment chemicals—don’t flush non-dissolving items.
  • Water is limited—short rinses; at campsites you can also use site bathrooms.
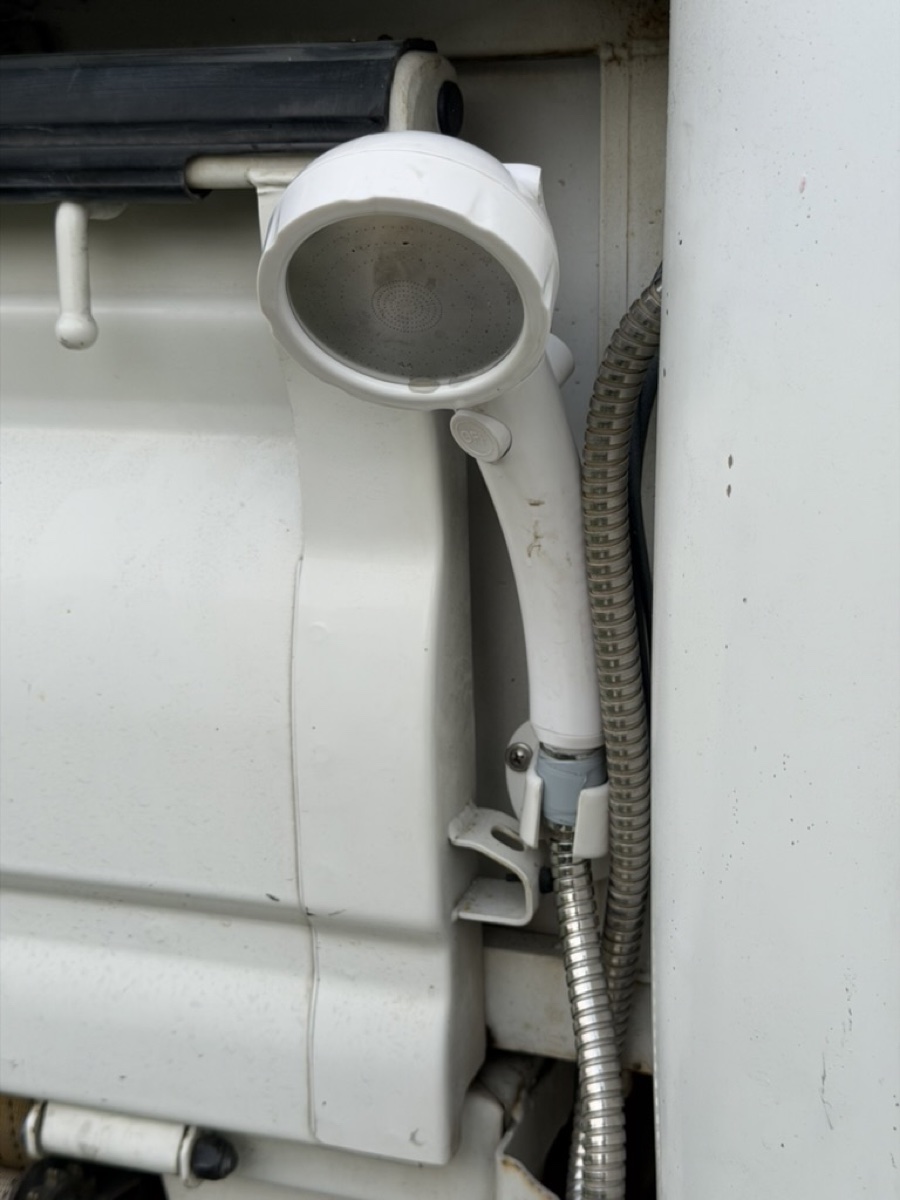
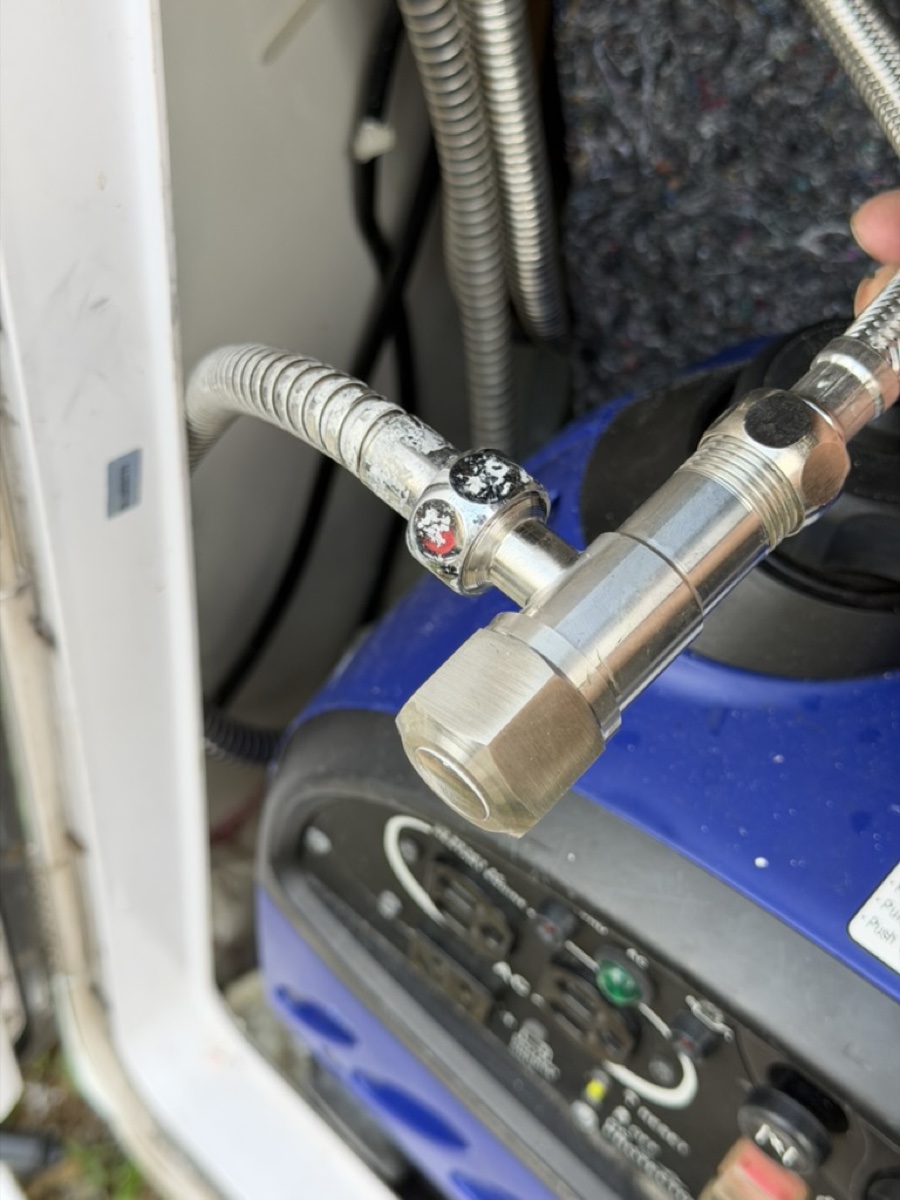
  • Exterior rinse shower (left rear) for feet, sand, pets after the beach. Turn on WATER PUMP first; turn off and stow hose after.
Taipei campervan left rear white rinse shower head on corrugated hose—for feet, sand or pets after the beach.
Exterior rinse shower (left rear compartment) Turn on water pump first; shake dry and stow when done.
Taipei campervan rinse shower stainless hose and quick-connect close-up—check fitting before stowing after beach use.
Rinse shower hose & quick connect Before stowing, check fittings are tight and hose isn’t kinked.
Campervan fresh water tank and bathroom usage reminder—limited water, short showers and daily use.
Water & bathroom reminders ~110 L fresh water—short showers, turn off firmly; heater needs gas and power.
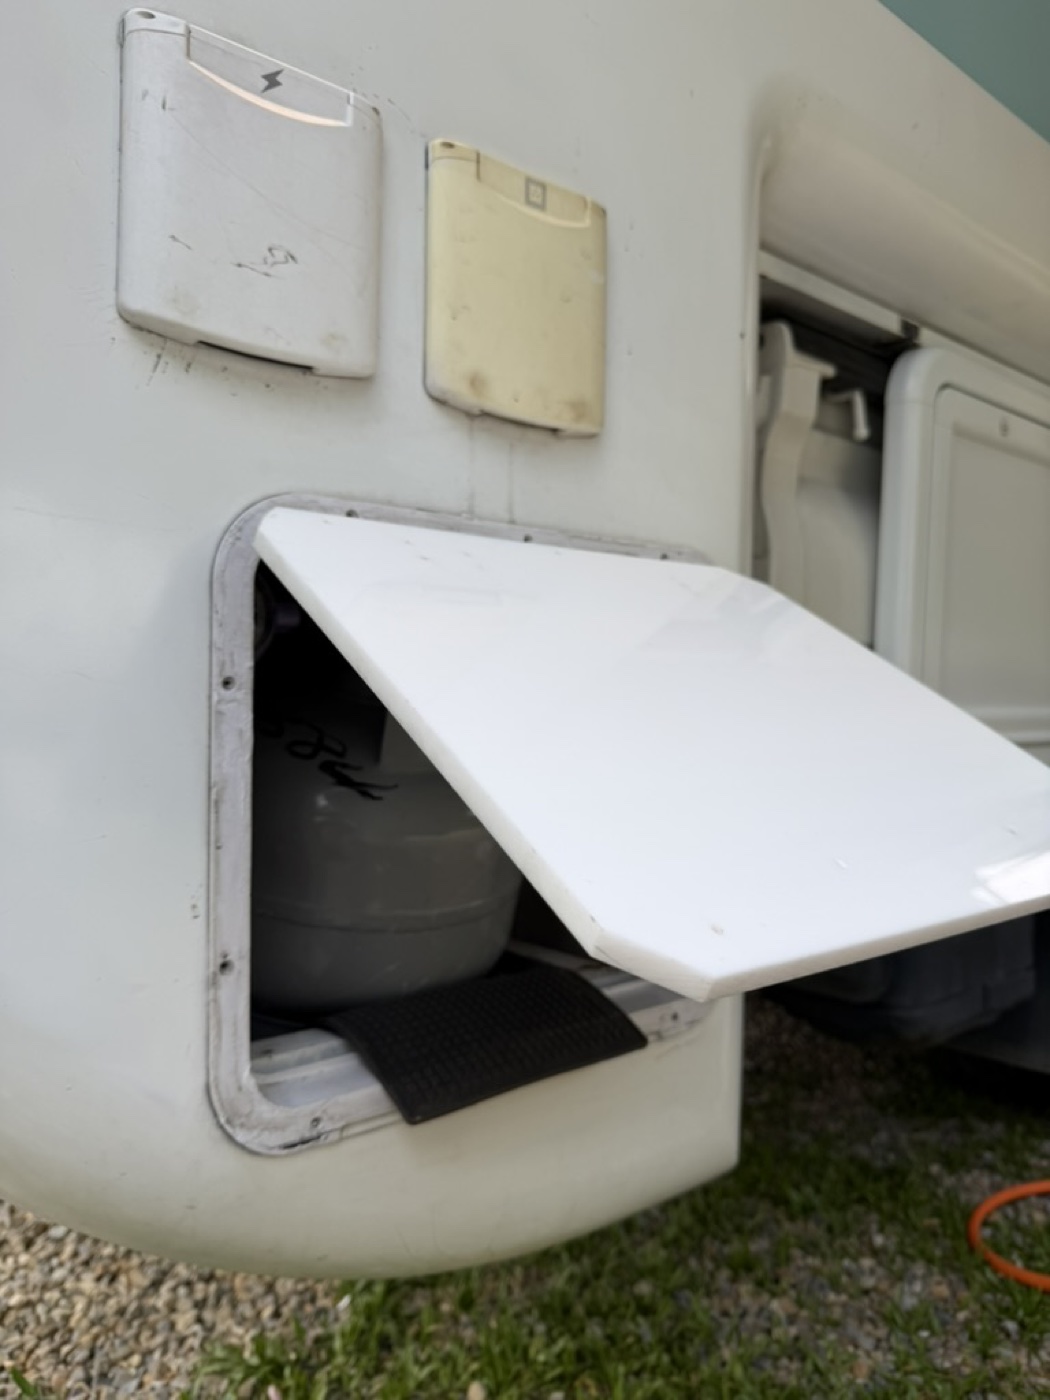
Taipei campervan right rear compartment open showing LP tank and lines—check only if hot water or stove issues arise.
LP gas (right rear compartment) Usually ready to use; if hot water fails, check gas per handover.
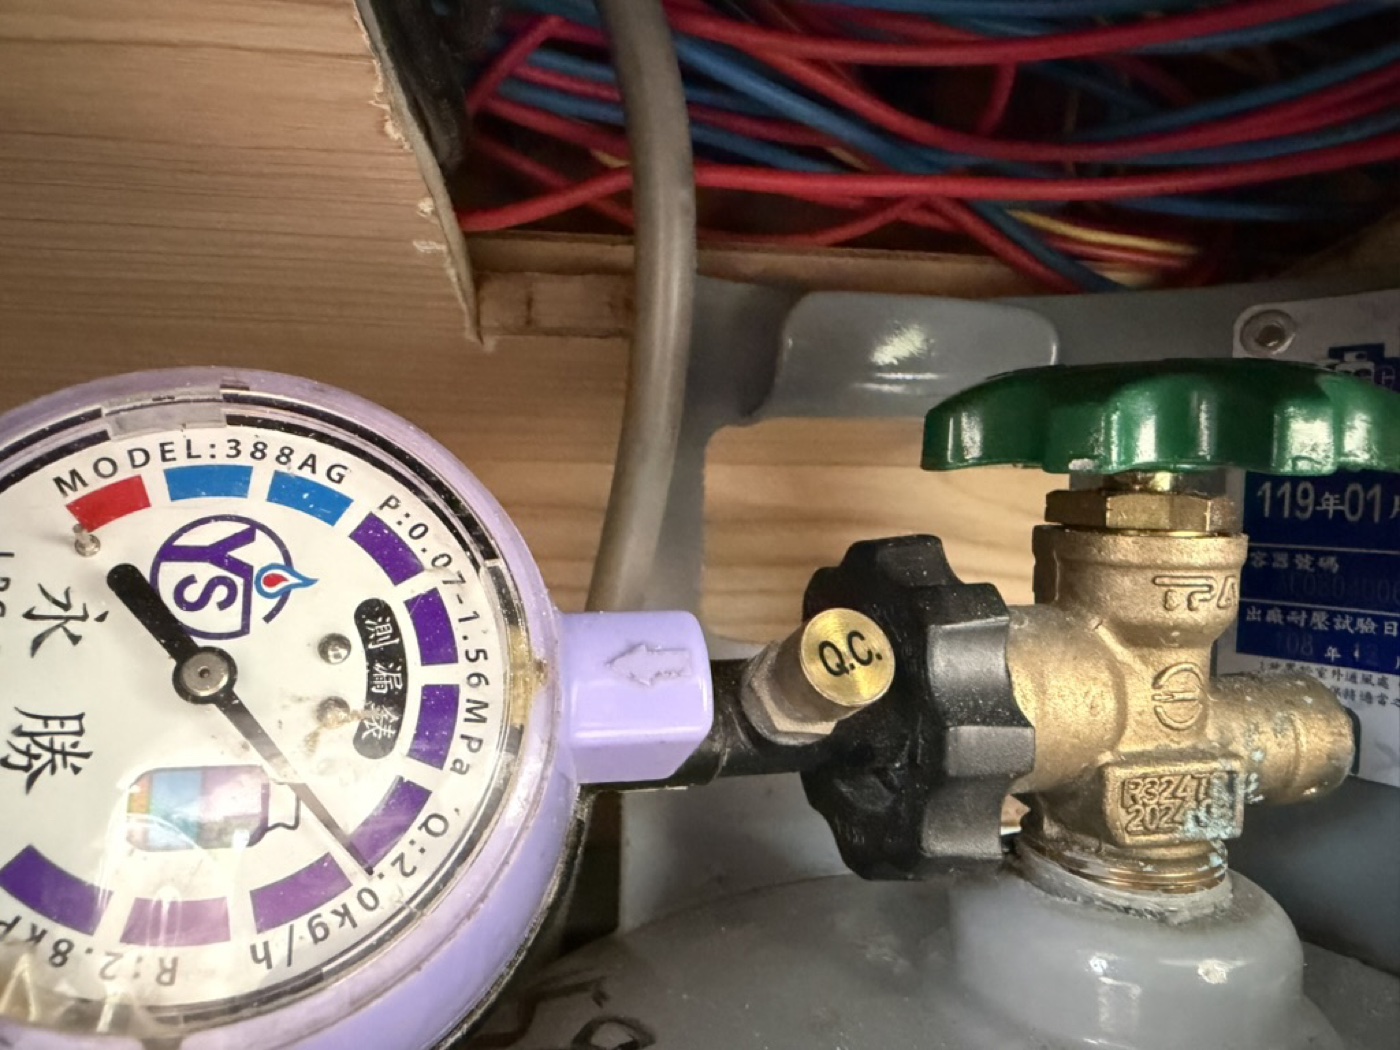
Taipei campervan LP regulator and pressure gauge close-up—main shutoff valve and safe operation points.
Regulator & main valve Follow handover-day demo for valve sequence—don’t force valves.

6. How to use the beds (video & diagrams)

Two double beds—one fixed, one from the dinette. Watch the video, then follow the steps below.

Dinette to double bed|Tutorial (full tour, bed section)

Same as the main intro video above—replay here in the Beds section. Also on YouTube: full tutorial video

We demo again on the real van at handover—watching early helps on the day.

Supplementary tutorial (2)|Operation reference

If the video above won’t play, or you want another walkthrough of interior operations, use this one.

If the embed doesn’t load, watch on YouTube.

  • There are two double beds onboard.
  • One is fixed (over cab); the other converts from the dinette.
  • Convert dinette to bed at night; restore for meals and lounging by day.
  • Fits 5 adults or 4 adults + 2 children.

Bed conversion: dinette → in progress → bed ready

In-van step sequence—cross-check with the video.

Taipei campervan interior: U-shaped seating and table in daytime dining mode before bed conversion.
① Dinette mode (daytime) Eat, chat, store gear—fold table and cushions before bed.
Taipei campervan interior mid-conversion: reconfiguring table and cushions to form the second double bed.
② Converting Fold table, adjust backs and cushions—follow handover and video.
Taipei campervan interior: living area fully converted to second double bed sleeping surface with bedding.
③ Bed ready Add bedding for the second double bed—with fixed bed, sleeps 5 adults or 4+2 kids.
Taipei campervan layout diagram: fixed overhead double bed and convertible dinette double bed positions.
Two double beds layout (diagram) One fixed over cab, one from dinette conversion.

7. Outdoor bundles & entertainment gear

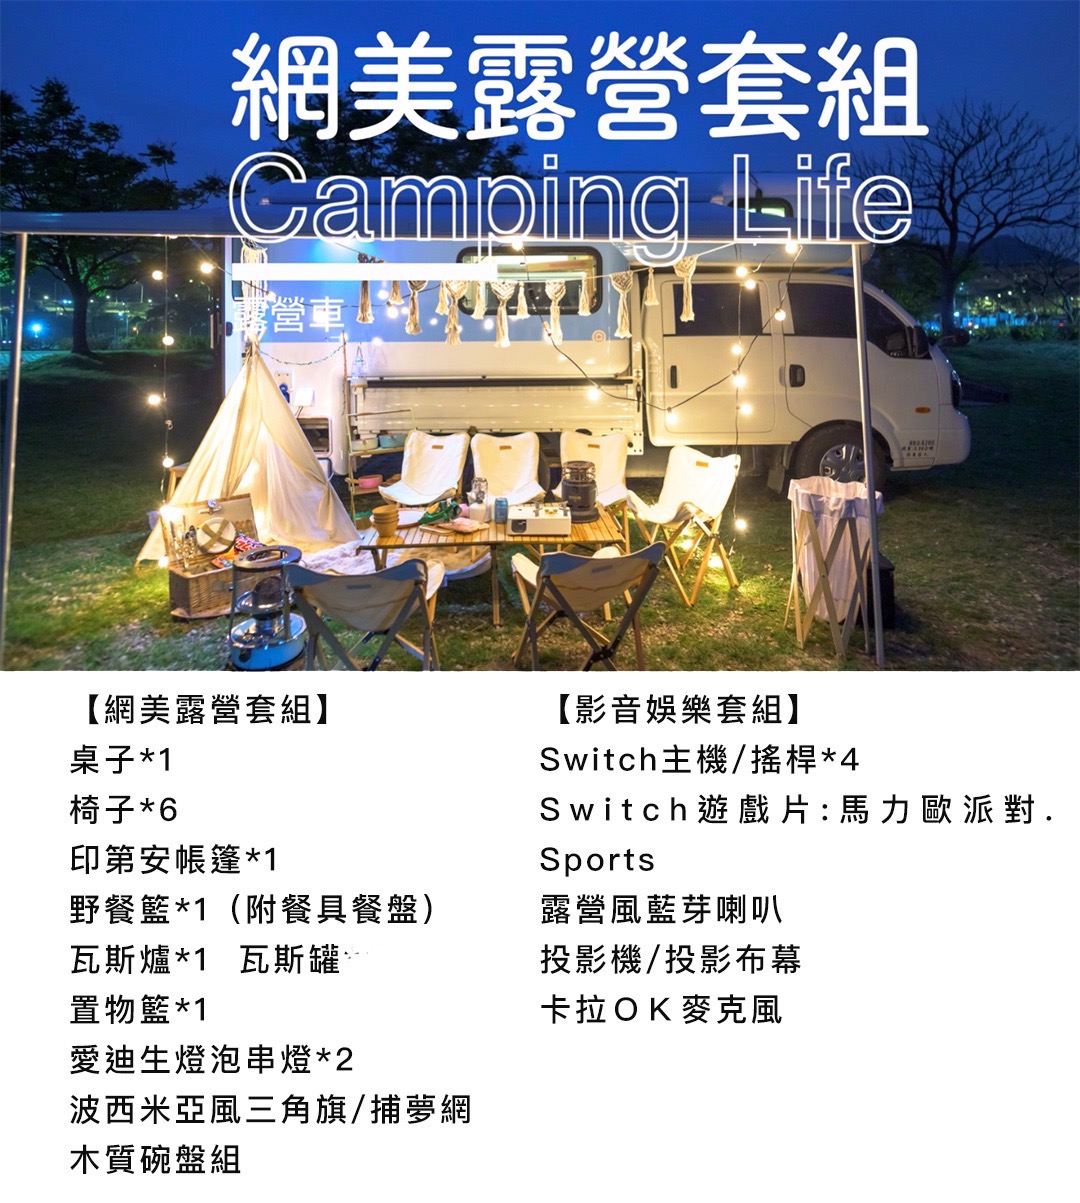
Outdoor table/chairs, lights, tent/canopy décor, projector, Switch, karaoke, etc. Bundle contents and promos: Price & Van|Limited offer; here we focus on how to use and pack away.

  • Outdoor table/chairs, string lights, canopy/tent décor, picnic styling
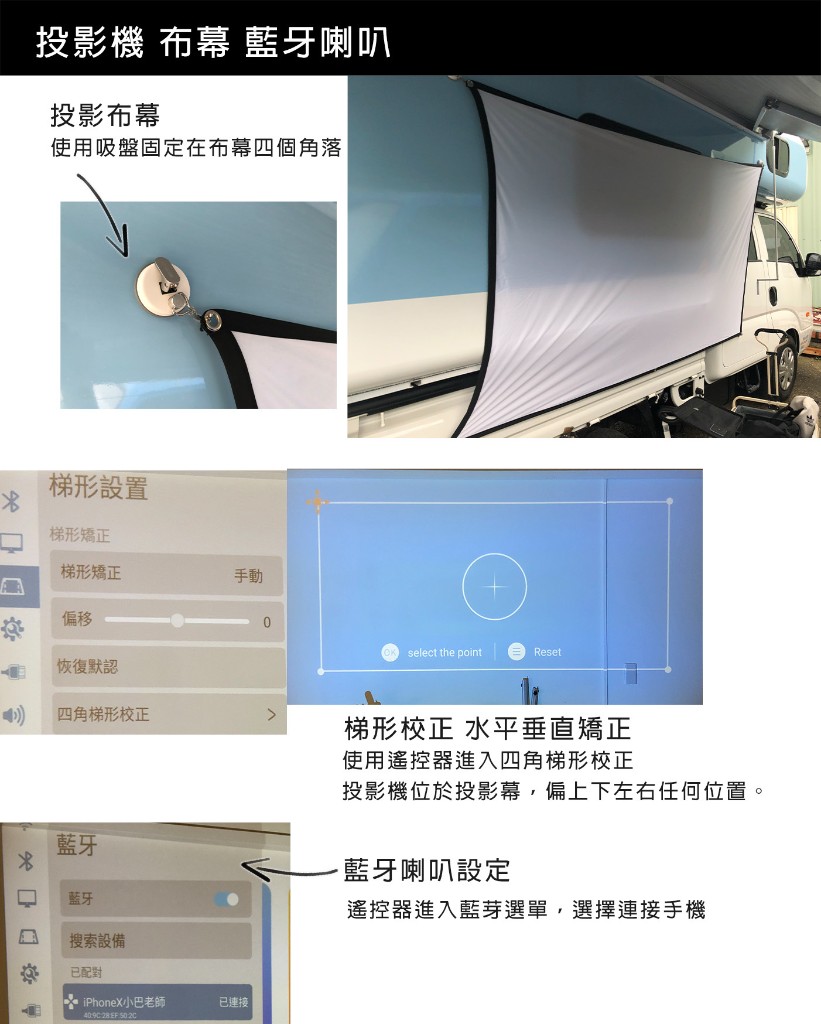
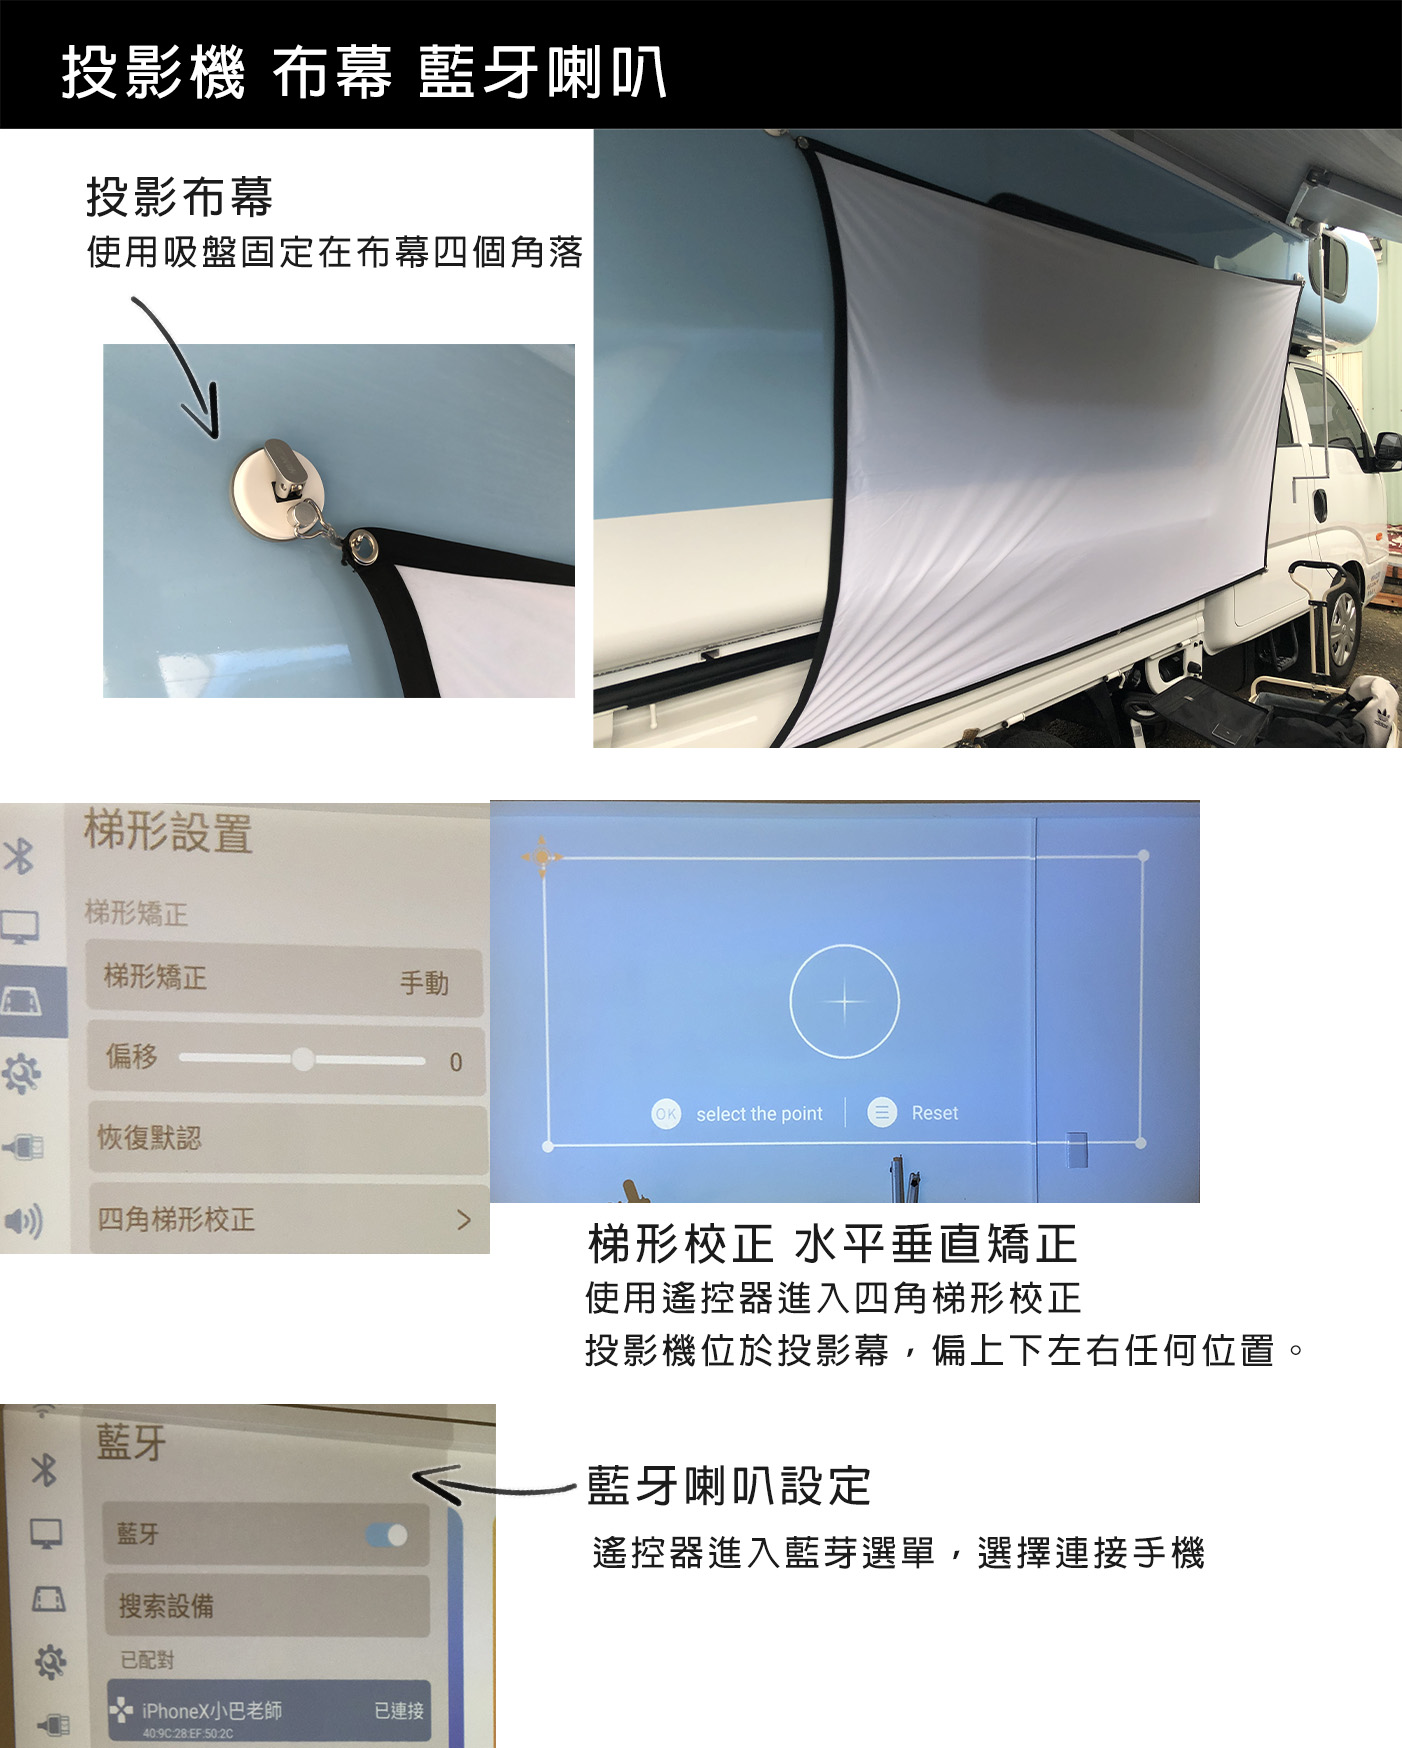
  • Entertainment bundle (Switch, projector, Bluetooth speaker, screen, karaoke mic)
  • Actual items depend on booking and stock—confirm when reserving
Use & return:Repack as received; keep lights and electronics dry; damage or loss may be charged.
Add-ons & promos:See limited offer on Price & Van; confirm stock when booking.
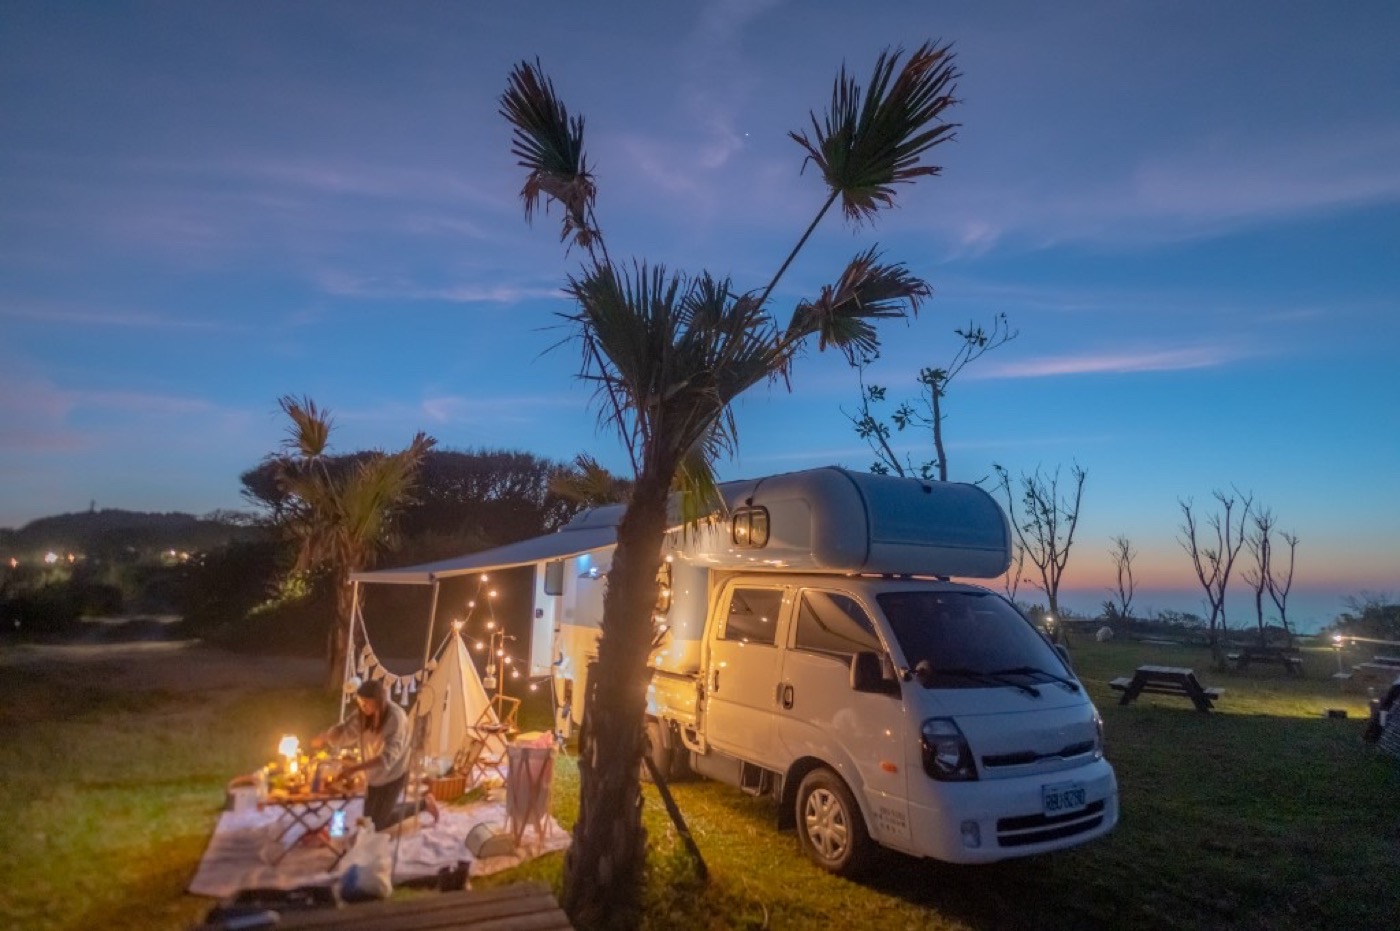
Taipei campervan glamping bundle: wooden outdoor table and chairs, string lights, tent-style décor and picnic setup for photos and van-side dining.
Glamping photo bundle (real setup) Items per booking/stock; repack and return after use.
Taipei campervan entertainment bundle diagram: projector, screen, Bluetooth speaker and indoor/outdoor playback positions.
Projector & audio bundle diagram Outdoors: rain and power; dry connectors when coiling cables.
Taipei campervan projector, screen and Bluetooth speaker setup beside or inside the van for movie night or gatherings.
Projector screen & Bluetooth speaker (real setup) Karaoke, Switch, etc. may be included—confirm at booking.
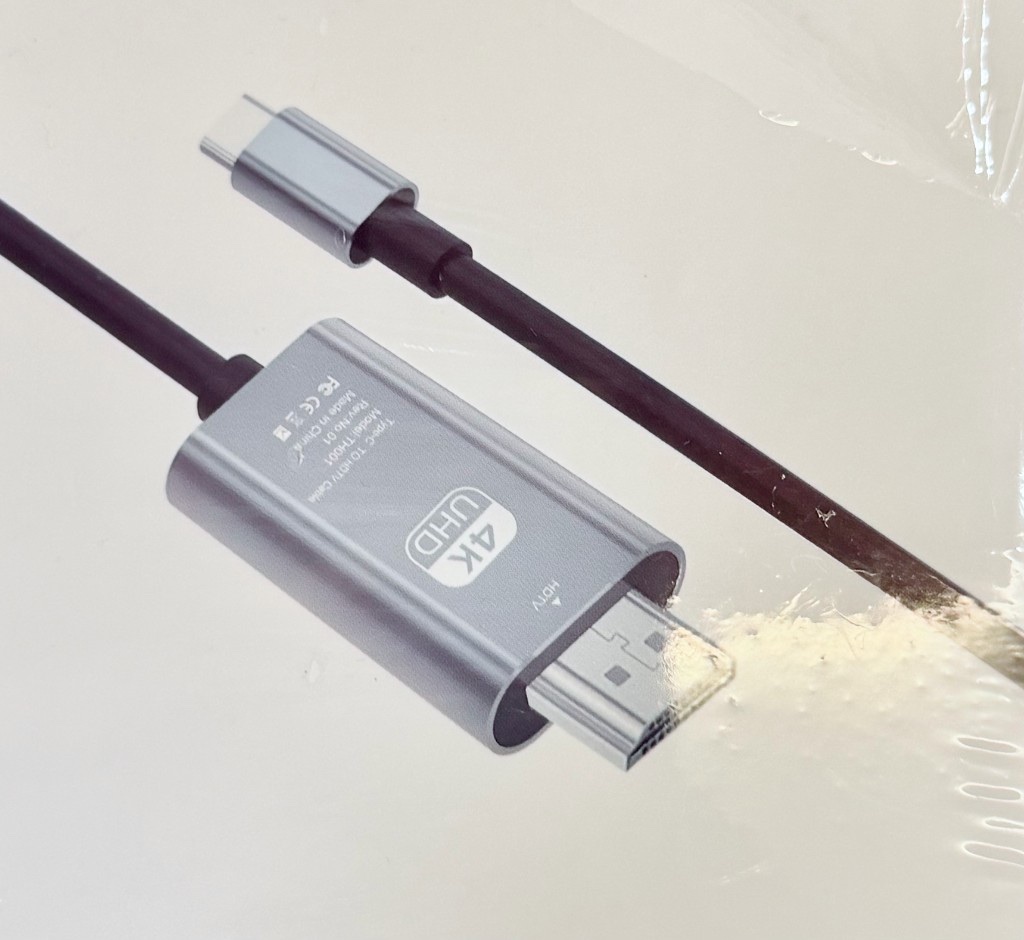
Taipei campervan AV guide: Type-C to HDMI 4K cable for casting laptop or phone to the projector.
Type-C to HDMI cable For laptop/tablet/phone casting, check ports and adapter—photo us if unsure.

8. Before return—please check

5 minutes with this list saves deposit settlement back-and-forth.

  • Personal items removed
  • Tableware and gear returned to place
  • Trash tidied
  • Outdoor furniture packed
  • Lights and extension cord packed
  • Water and power off
  • No obvious interior mess
  • Fuel topped up per agreement (full tank return, diesel)
  • ETC, parking, or other fees settled later
  • Deposit refunded after deductions

9. Insurance & damage responsibility

Coverage scope, third-party and passenger protection, chassis vs camper box damage, and normal wear vs major damage.

A note for peace of mind

Campervans live outdoors—light branch marks and small surface scuffs on mountain or campsite roads are normal; we don’t charge for that kind of everyday wear.

We focus on clear, serious damage—e.g. roof hitting a stainless awning frame, large scrapes, waterproofing failure and leaks. Those require repair and are charged per actual loss.

With normal careful use you’re usually fine—watch height, rear overhang, and backing space; avoid awnings, low clearance, steel frames, branches, and overhead obstacles.

1. Insurance coverage

The vehicle carries third-party liability, excess third-party liability, and physical damage insurance. Claims follow the policy; scope, items, amounts, and approval are determined by the insurer.

2. Third-party liability

Injury, death, or property damage to third parties may be covered by third-party and excess third-party policies. Excess coverage includes third parties and passengers, up to NT$20 million.

3. Passenger coverage

Passenger injury, medical, and related benefits follow applicable rider policies per policy terms and insurer determination.

4. Physical damage scope

Physical damage mainly covers the automobile body; on a campervan, chassis vs box, roof, and add-ons may differ—not every part is covered.

5. Not covered or renter-borne

If the camper box, roof, structures, equipment, or accessories are damaged in these ways and not covered, the renter bears repair, restoration, business loss, or other necessary costs:

  1. Roof hits clearance bars, awnings, canopies, branches, signs, steel frames, or overhead obstacles.
  2. Rear, sides, or protruding box parts hit while turning, passing, backing, parking, or entering campsites.
  3. Damage from not accounting for height, width, length, or turning radius.
  4. Beyond normal wear: clear impact, crush, crack, leak, deformation, or structural damage.

6. Normal wear

Slight branch marks or surface wear on mountain, campsite, or shaded roads within normal use are not charged.

7. Major damage claims

Improper driving or inattention to height/obstacles causing major roof, shell, structure, or waterproof damage (large scrapes, cracks, dents, leaks, factory repair) may be claimed from the renter.

8. Renter duty of care

Renters must care for the vehicle and drive safely—height, width, length, turning space, backing sight lines, awnings, parking clearance, camp canopies, branches, and level changes—to avoid uninsured damage.

10. FAQ

Operation and use questions below; rates, deposit, rental length, delivery: Price & Van FAQ.

Category 1|Capacity & beds

Legal seating and recommended sleepers.

Legal seating: 6.
Up to 5 adults or 4 adults + 2 children. Two double beds—one converts from the dinette.

Category 2|Driving

License, height, daily distance, etc.

Standard passenger car license (automatic) is enough—no special camper license.
Height ~3 m (one story)do not enter typical underground parking; check bridges, awnings, signs, and trees.
Safety and buffer time first—about 200 km/day suggested, per rental agreement. The point is stopping to enjoy.
Yes. 30-minute handover on basics, water, power, A/C, beds, bathroom—plus this full guide.

Category 3|Equipment & power

Tableware, fridge, stove, A/C, portable generator.

Portable generator is not standard—request when booking if needed.

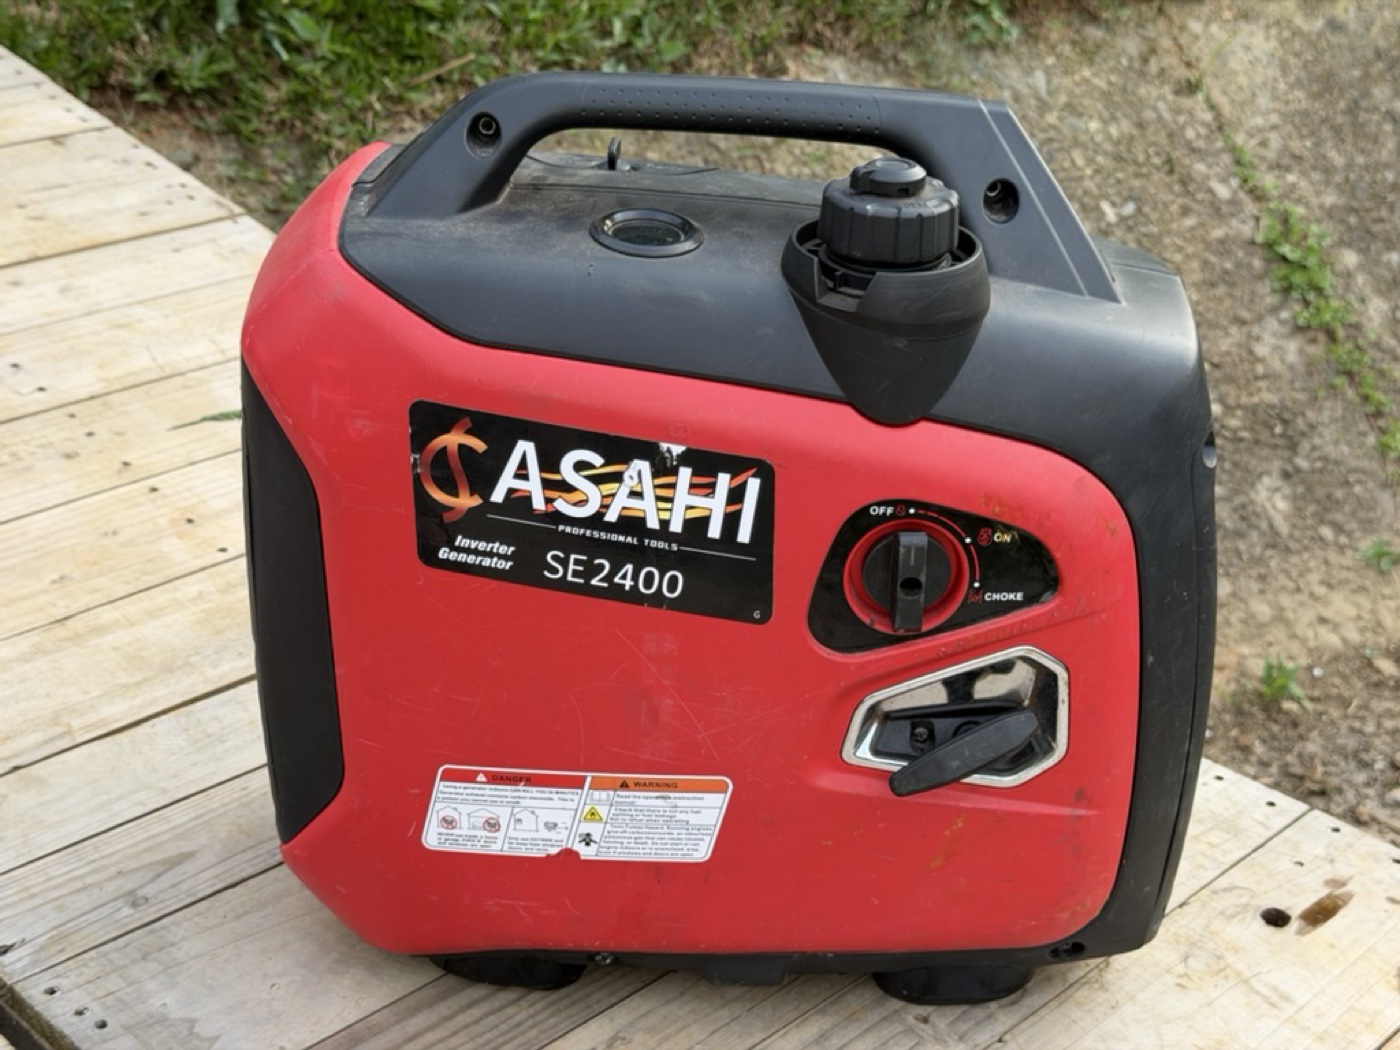
Red portable generator: quieter overnight option (ASAHI SE2400)

We can provide a red portable generator (ASAHI SE2400 Inverter Generator). Run it farther away with an extension cord (behind rocks, parking lot edge) so A/C overnight is quieter—especially off campsite.

Taipei red portable ASAHI SE2400 inverter generator on wooden deck—run farther away with extension cord for quiet overnight A/C.
Red portable generator ASAHI SE2400 Portable inverter—run outdoors away from the van to reduce noise inside.

Portable generator|Quick steps

  1. Placement: flat ground, away from van and tent door—outdoors with ventilation only.
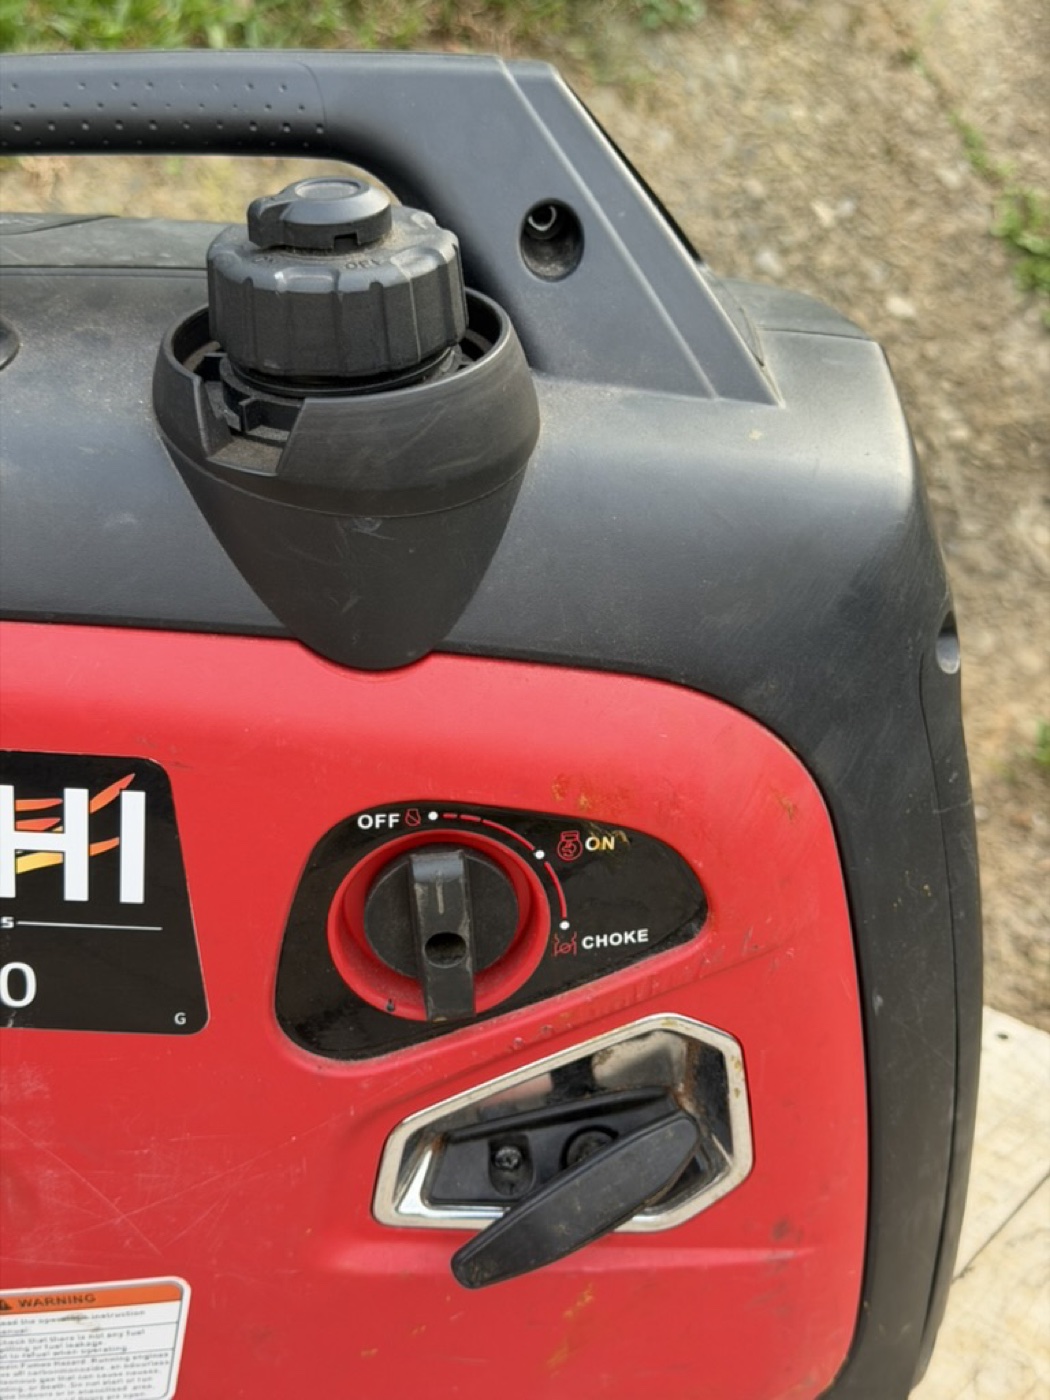
  2. Fuel: open black fuel cap, check level; shut off and cool before refueling.
  3. Switch: cold start on CHOKE, pull cord, then ON when stable; OFF to stop.
  4. Eco mode: for long low load—slower, quieter, saves fuel.
  5. Plug in: connect white two-pin camper plug to AC outlet (20A).
  6. Shutdown: unplug → eco off → OFF, cool down, stow.
ASAHI SE2400 fuel cap and OFF/ON/CHOKE switch close-up on Taipei campervan portable generator.
Fuel cap & OFF/ON/CHOKE switch Cold start → CHOKE; stable → ON; stop → OFF.
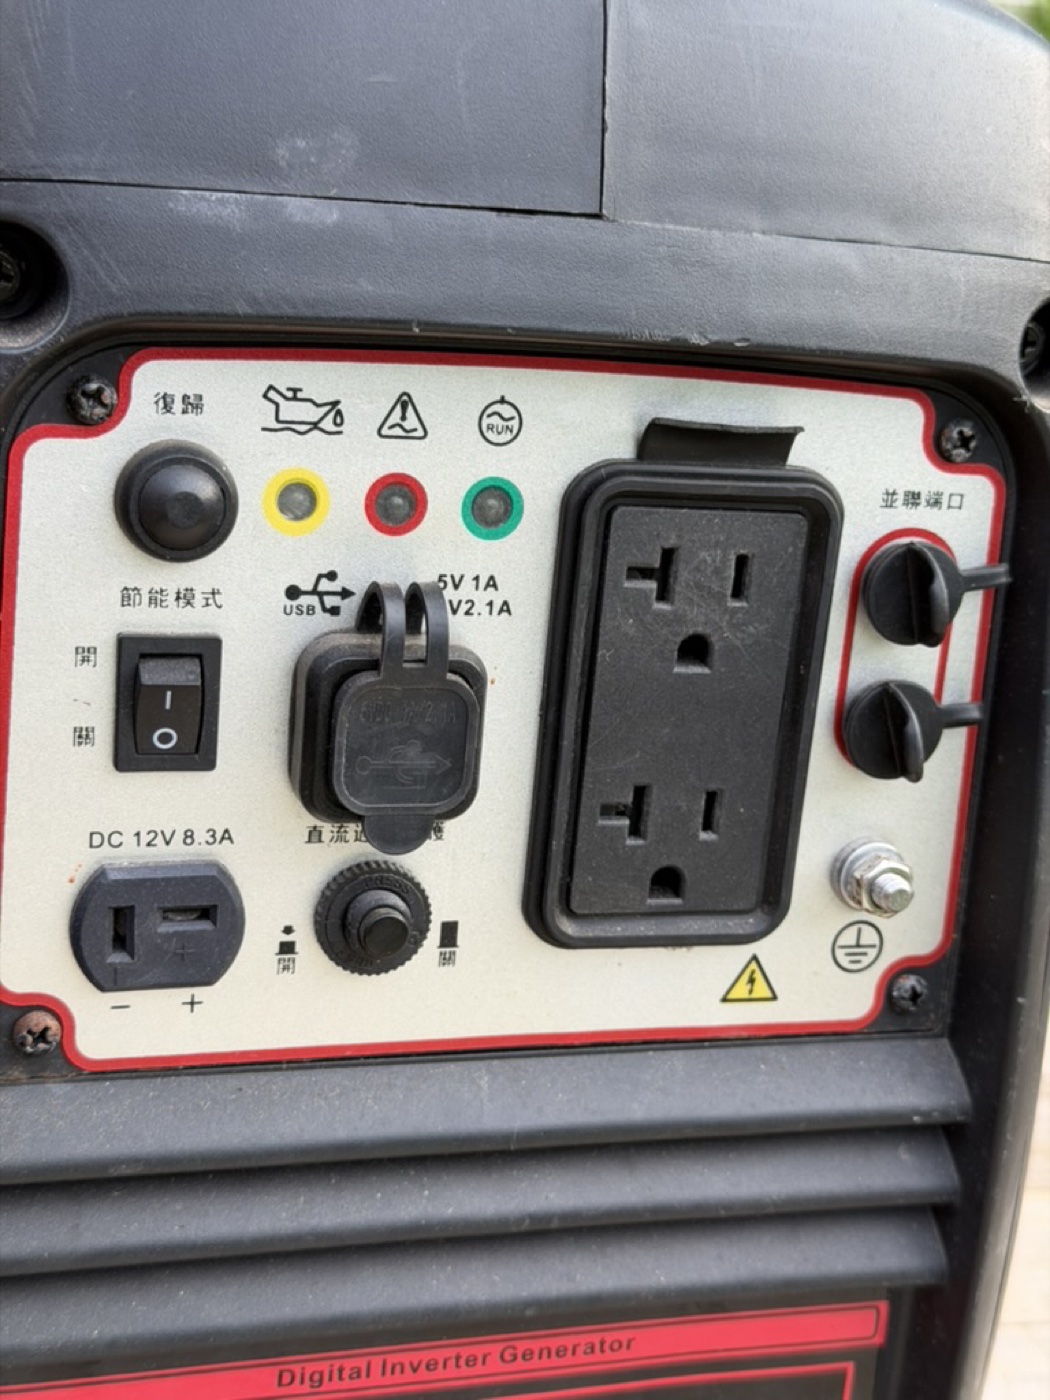
ASAHI SE2400 control panel: reset, eco mode, USB, DC 12V, dual AC outlets, parallel port and ground terminal.
Control panel|AC outlets & eco mode Camper plug to AC outlet; eco mode recommended for long charging.

Detailed photo guides below—collapsed by default; tap to expand.

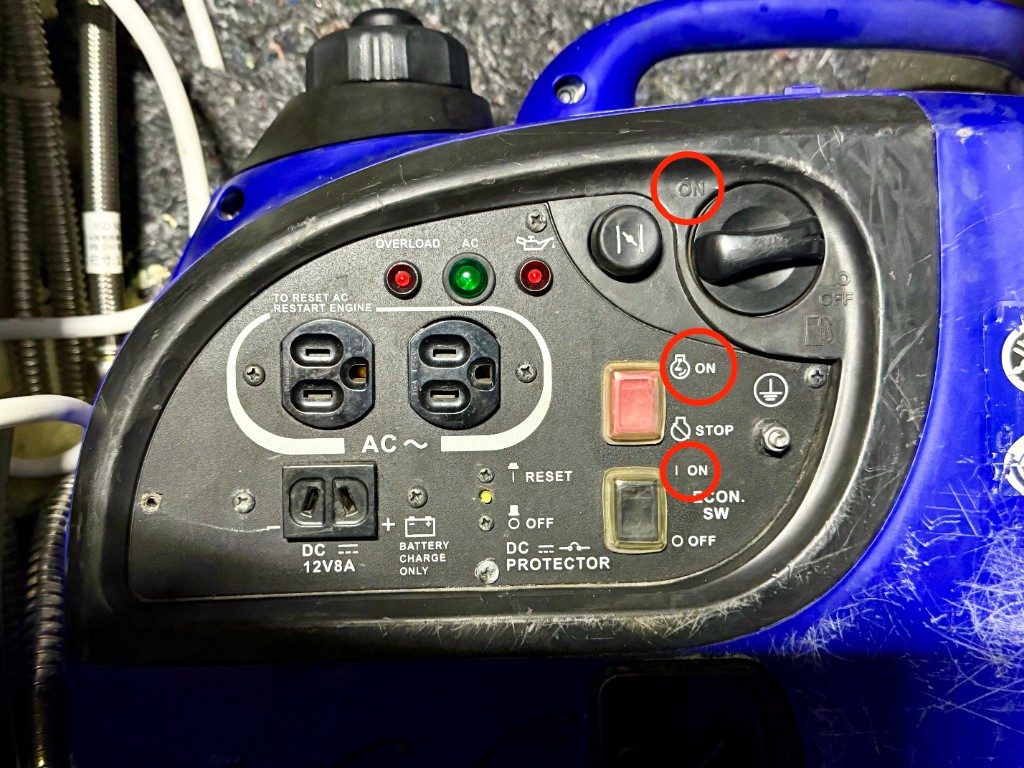
Control panel|Three ON switch positions

Set to ON when running; OFF when shutting down

After starting, confirm the three red-circled positions on the panel are set to ON (or I ON):

  1. Main dial: CHOKE for cold start, then ON when stable.
  2. Light-bulb switch: set to ON.
  3. ECON. SW (eco mode): set to I ON.
ASAHI SE2400 portable generator control panel close-up with red circles marking main dial ON, light switch ON and ECON. SW I ON positions.
Panel close-up|Three ON positions Confirm red-circled switches are ON; set all three to OFF before shutdown.

To shut down, set all three back to OFF (or O OFF), then let the unit cool before stowing.

Refueling|2 liters 95 unleaded gasoline

Add the supplied can when empty—do not exceed 2 L

When the tank runs empty, add fuel from the supplied 2-liter gas can. The can is labeled 「2公升」 and 「95無鉛」—use 95 unleaded gasoline only.

White 2-liter fuel can supplied with Taipei campervan portable generator, labeled 2 liters and 95 unleaded gasoline.
Supplied 2 L fuel can|95 unleaded Add the full can when empty; do not exceed 2 liters—overfilling can damage the generator.
Important: shut off and let the generator cool before refueling; never add more than 2 liters.

High heat while running|Keep the area clear

The unit gets very hot—ventilate and keep surroundings clear

The generator gets very hot while running. Do not place these items next to it:

  • Fuel cans / gasoline
  • Power cords / extension cords
  • Hoses / water lines
  • Other clutter or flammable items

Place the unit outdoors on flat ground, well ventilated, away from the van and tent door. Run extension cords away from the body—do not coil them against the hot casing.

Safety:Generators only outdoors with ventilation—never inside, under awning, or in enclosed spaces (CO risk).
Basic tableware and simple prep space—confirm at handover.
Yes—fridge and freezer, good for 2–3 day trips.
Yes—portable stove for noodles, soup, breakfast, coffee, hot pot, or camp cooking.
Yes. On battery alone ~8–10 hours; for longer use, shore power or generator.

Category 4|Water & bathroom

Fresh water, hot water, toilet.

Yes. Private bathroom with hot/cold shower—110 L fresh water for ~4–8 showers. Conserve water; not for long hotel-style baths.
Interior use is fine in rain; keep outdoor furniture, lights, and projector dry.

Category 5|Campsites & travel

Where to stay, roadside overnight.

Not required, but night one at a campsite with power, water, and bathrooms helps you learn charging, water, shower, and systems.
Park at campsites, park lots, or beaches where allowed—not all campsites accept campervans; confirm ahead. Outdoor gear only at legal sites.

Category 6|Pets & cleaning

Pets, cleaning fees.

Small/medium dogs OK (groomed beforehand); cleaning NT$800 per trip—other terms at handover.
No smoking in the van—cleaning fee NT$2,000–6,000 if violated.

Category 7|Deposit & claims

Scratches, roof hits, insurance. Full terms: 9. Insurance & damage responsibility above.

Light branch marks and small scuffs are usually normal wear. Clear impacts, large damage, leaks, or safety issues may be deducted from deposit; excess billed separately. Third-party and physical damage insurance apply, but chassis vs box/roof/add-ons may differ—many box/roof hits aren’t covered. See insurance & damage.
Stop safely, photo, and contact us. Leaks or structural roof damage can be costly. Always watch height (~3 m) and rear space—avoid awnings, low clearance, steel, branches, underground parking. See insurance & damage.

More questions?

For operation details, use the contents above; for dates and pricing, see Price & Van or message via booking page.